
As I stood in my kitchen with a craving for something sweet yet effortless, I remembered the magic of my No Bake Biscoff Cheesecake. This delightful dessert brings together the creamy richness of cream cheese and the caramelized, warm notes of Biscoff cookies—without ever turning on the oven! It’s perfect for those days when time is tight but your sweet tooth still demands satisfaction. You’ll love how it’s a total crowd-pleaser, allowing you to impress your guests or indulge yourself with minimal fuss. Plus, with a quick prep time, you can have this dreamy cheesecake chilling in the fridge in no time. Ready to discover how to make this irresistible treat? Let’s dive in!
Why is This Cheesecake a Must-Try?
Effortless Preparation: You don’t need to be a baking pro; this No Bake Biscoff Cheesecake comes together with simple steps that anyone can master.
Unique Flavor Twist: The combination of creamy cheesecake and spiced Biscoff cookies creates a taste sensation that will leave you and your guests craving more.
Versatile Variations: Want to switch it up? Try substituting Biscoff cookies with graham crackers or Oreos for a fun twist, making it adaptable for any occasion.
Perfect for Gatherings: This dessert is sure to be a star at your next event, impressing friends and family without hours spent in the kitchen.
Make-Ahead Friendly: Make it a day in advance for stress-free entertaining. It stores beautifully in the fridge or can be frozen for later indulgence.
So grab your ingredients and get ready to enjoy every creamy, dreamy bite of this cheesecake. You won’t want to miss out on this indulgent dessert!
No Bake Biscoff Cheesecake Ingredients
• Dive into the delightful components of this dessert that will satiate your sweet cravings!
For the Crust
- Biscoff Cookies – Provide the essential flavor and crunch; substitute with graham crackers or Oreos for a different twist.
- Unsalted Butter – Binds the cookie crumbs; make sure it’s melted for a smooth mix.
For the Filling
- Cream Cheese – The heart of the cheesecake, delivering luxurious creaminess; ensure it’s softened for easy blending.
- Powdered Sugar – Sweetens the filling, perfectly balancing the cream cheese’s tangy notes.
- Vanilla Extract – Lends a warm, inviting flavor; it’s optional but enhances the overall taste.
- Heavy Whipping Cream – Whipped to stiff peaks to add an airy lightness to the filling.
- Biscoff Spread – Infuses the cheesecake with the signature Biscoff flavor, making it wonderfully indulgent.
- Ground Cinnamon (optional) – Adds a warm spice; a delightful extra layer of flavor.
For the Topping
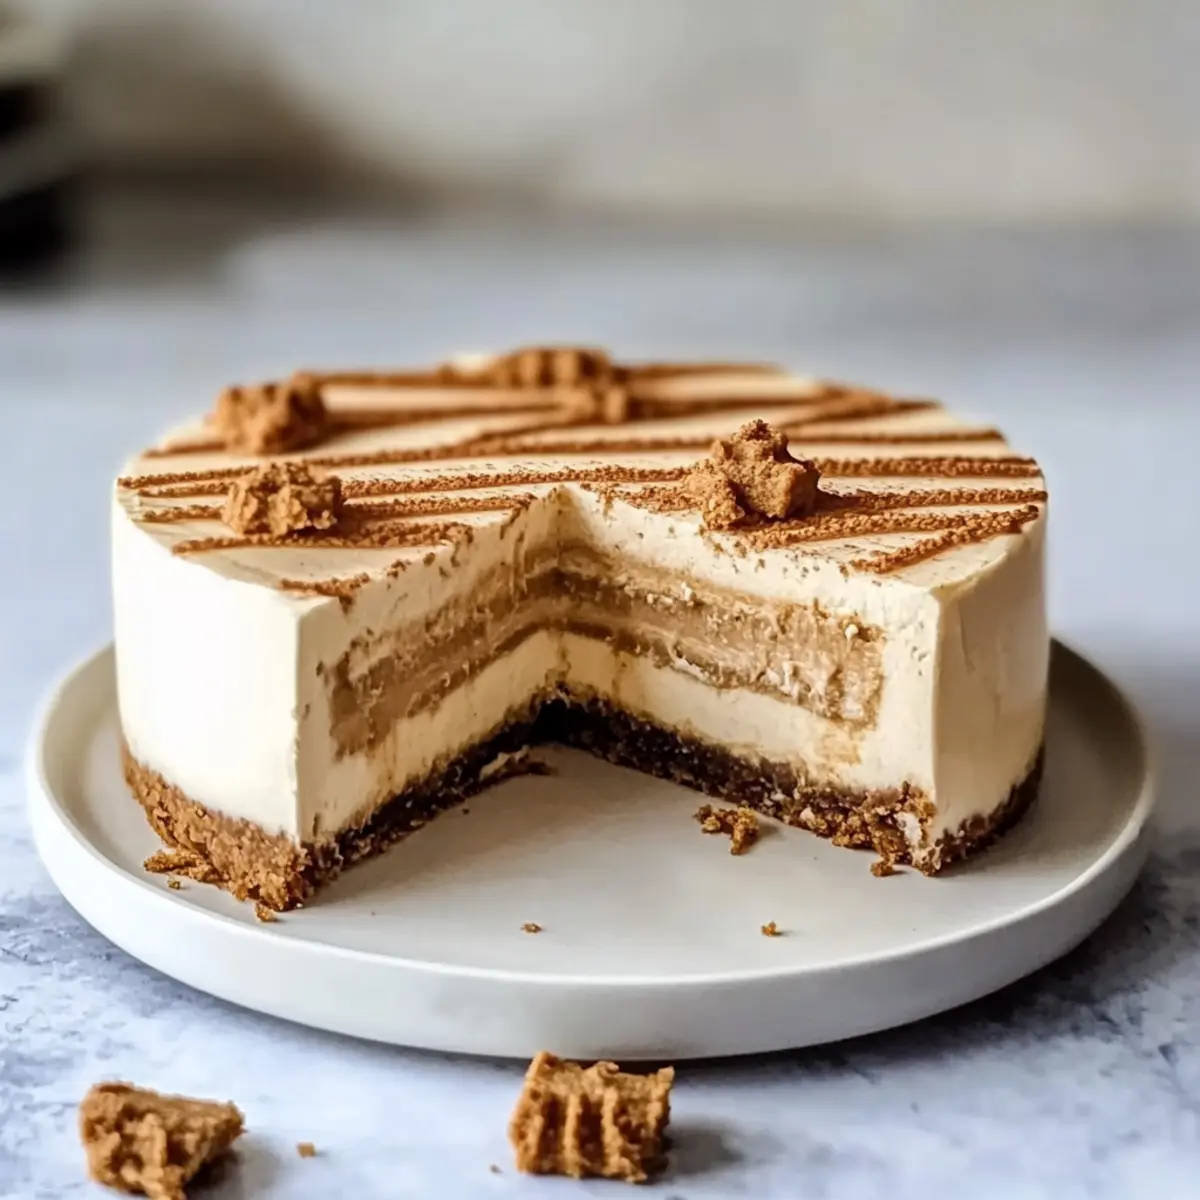
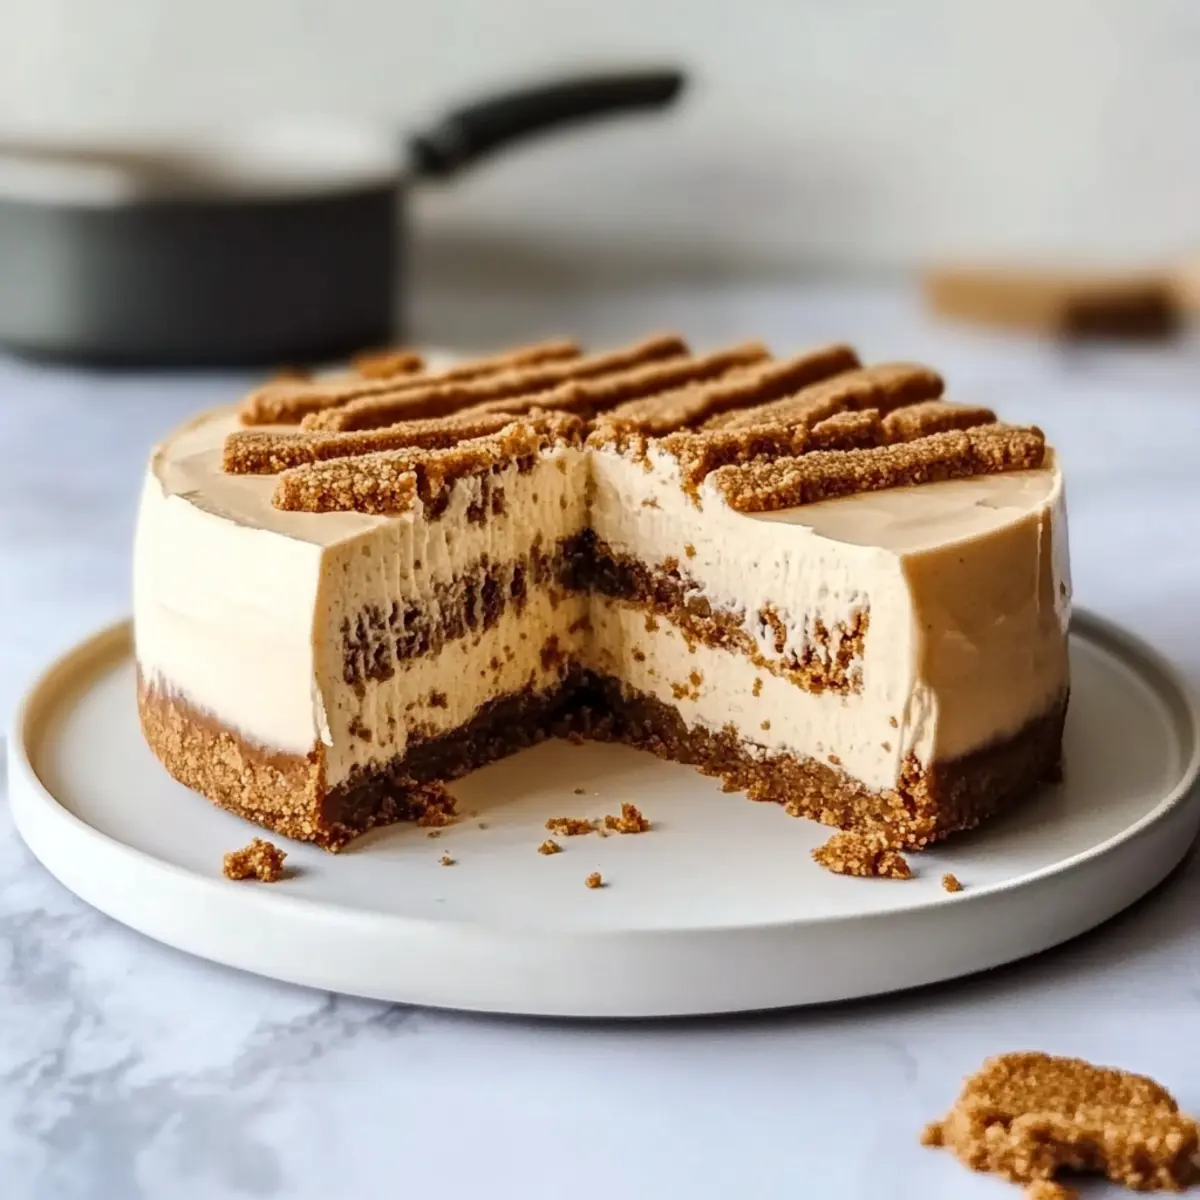
- Extra Biscoff Cookies – Use these for an irresistible topping; they enhance both presentation and flavor!
Step‑by‑Step Instructions for No Bake Biscoff Cheesecake
Step 1: Crush the Cookies
Start by finely crushing 24 Biscoff cookies using a food processor or a rolling pin. Aim for fine crumbs that resemble sand, which will create a delicious and crispy crust for your No Bake Biscoff Cheesecake. This should take about 2-3 minutes. Set the crushed cookies aside while you prepare the butter.
Step 2: Prepare the Crust
Melt 4 tablespoons of unsalted butter in the microwave, then combine it with the crushed Biscoff cookies in a mixing bowl until it resembles wet sand. Using the back of a measuring cup or your fingers, firmly press this mixture into the bottom of a 9-inch springform pan. Once evenly packed, refrigerate for 15-20 minutes to set the crust.
Step 3: Mix the Filling
In a large mixing bowl, beat 16 ounces of softened cream cheese using an electric mixer on medium speed until smooth and creamy. Gradually add 1 cup of powdered sugar and 1 teaspoon of vanilla extract while mixing, ensuring the mixture is well combined and free of lumps. This should take about 3-4 minutes.
Step 4: Whip the Cream
In a separate bowl, whip 1 cup of heavy cream with an electric mixer until stiff peaks form—this may take around 4-5 minutes. Once achieved, gently fold the whipped cream into the cream cheese mixture with a spatula, being careful not to deflate its light texture.
Step 5: Add the Biscoff Spread
Warm 1/2 cup of Biscoff spread in the microwave for about 15 seconds until it’s easily pourable. Slowly drizzle this into the cream cheese mixture, lightly folding it to create a lovely marbled effect. For an added spice note, you can also mix in 1/2 teaspoon of ground cinnamon during this step.
Step 6: Combine and Chill
Pour the cheesecake filling over the chilled crust, smoothing the top with a spatula for an even surface. Cover the springform pan with plastic wrap and refrigerate for at least 4 hours, or until the cheesecake is set. This chilling time allows the flavors to meld beautifully.
Step 7: Add the Finishing Touches
Once the cheesecake has set, remove it from the refrigerator. Before serving, top with additional crumbled Biscoff cookies and drizzle with any remaining melted Biscoff spread for an elegant finish. This final touch not only enhances appearance but also packs in even more delicious flavor.

How to Store and Freeze No Bake Biscoff Cheesecake
Fridge: Store the cheesecake in an airtight container or cover it tightly with plastic wrap for up to 5 days. Keeping it chilled will maintain its creamy texture and flavor.
Freezer: For longer storage, freeze the cheesecake tightly wrapped for up to 2 months. Make sure it’s well protected to prevent freezer burn.
Thawing: To enjoy your frozen No Bake Biscoff Cheesecake, transfer it to the fridge for several hours or overnight to thaw before serving. This ensures it retains its delightful texture.
Reheating: There’s no need to reheat this dessert! Simply serve it chilled, topped with extra Biscoff cookies and a drizzle of sauce for the best experience.
What to Serve with No Bake Biscoff Cheesecake
Indulging in a slice of this creamy cheesecake creates the perfect opportunity to enhance your dessert experience with delightful pairings.
-
Fresh Berries: Juicy strawberries or raspberries add a tart contrast that complements the richness of the cheesecake beautifully. The vibrant colors also brighten the presentation.
-
Whipped Cream: A dollop of freshly whipped cream offers an airy texture that balances the dense cheesecake while enhancing its sweetness. It’s a classic addition that never disappoints!
-
Chocolate Sauce: Drizzling warm chocolate sauce over each slice transforms it into an elegant dessert, adding richness and decadence that chocolate lovers will adore.
-
Caramel Drizzle: A sweet caramel drizzle elevates flavors, infusing a creamy chewiness that pairs wonderfully with the crunchy Biscoff crust. This option is a sweet symphony for your palate.
-
Coffee or Espresso: Brewing a cup of rich coffee or espresso provides a warm, bitter contrast that highlights the sweet notes of the cheesecake, creating a cozy finish for your meal.
-
Nutty Biscotti: Serve crunchy biscotti on the side for a delightful textural contrast. The toasted nuts and spices will add extra depth to your dessert experience.
Every bite enhances your journey into flavor harmony—the perfect way to savor this No Bake Biscoff Cheesecake!
Expert Tips for No Bake Biscoff Cheesecake
-
Cream Cheese Care: Ensure that the cream cheese is at room temperature before mixing. This prevents lumps, creating a silky smooth filling that your guests will love.
-
Gentle Folding: When adding whipped cream to the cream cheese mixture, fold gently and slowly. Over-mixing can deflate the airiness, resulting in a denser cheesecake.
-
Chill Time Importance: Don’t skip the chilling time! Allow the No Bake Biscoff Cheesecake to set for at least 4 hours in the fridge to develop those wonderful flavors fully.
-
Layering Flavors: Drizzling in warmed Biscoff spread instead of mixing it in completely allows for a beautiful, marbled effect that enhances both taste and presentation.
-
Crust Consistency: Ensure that your cookie crust resembles wet sand before pressing it into the pan. A well-pressed crust holds together better and provides a satisfying crunch.
No Bake Biscoff Cheesecake Variations
Feel free to explore these delicious possibilities and tailor your No Bake Biscoff Cheesecake to your taste!
- Classic Graham Cracker: Swap Biscoff cookies for graham crackers for a timeless dessert that never disappoints. This variation embraces simplicity while delivering that beloved cheesecake flavor.
- Oreo Delight: Use crushed Oreos instead of Biscoff for a rich chocolate twist. The chocolatey base adds a decadent alternative that’s perfect for chocolate lovers!
- Nutty Crunch: Incorporate finely chopped nuts, like walnuts or pecans, into the crust for added crunch and flavor depth. The nuttiness complements the creamy filling beautifully, creating a delightful contrast.
- Chocolate Swirl: Mix in cocoa powder to the cream cheese filling for a chocolatey version of the cheesecake. This adds another layer of indulgence that chocolate enthusiasts will adore!
- Dairy-Free Twist: Replace cream cheese with a dairy-free alternative and use coconut cream instead of heavy cream. Enjoy a deliciously creamy texture while accommodating dietary preferences.
- Spiced Up: Sprinkle a bit of pumpkin spice into the filling for a festive twist during fall. It brings an exciting flavor that pairs perfectly with the Biscoff’s notes of cinnamon.
- Maple Sweetness: Swap powdered sugar for maple syrup for a warm, autumn-inspired flavor. This creates a deliciously unique sweetness that offers a lovely contrast to the creamy texture.
- Berry Topping: Top your cheesecake with fresh berries such as strawberries or blueberries for a burst of freshness. They not only enhance visual appeal but also balance the richness of the cheesecake.
These variations allow you to customize your cheesecake for any occasion or palate. Experiment to find your perfect match! If you’re intrigued by a twist on classic desserts, consider checking out our delicious recipes for [No Bake Cheesecake](internalLink) or our heavenly [Chocolate Cheesecake](internalLink) for more inspiration!
Make Ahead Options
These No Bake Biscoff Cheesecakes are perfect for meal prep, making your sweet cravings easy to satisfy even on the busiest of days! You can prepare the crust and filling up to 24 hours in advance. Simply make the crust, refrigerate for 15-20 minutes, and then prepare the filling as directed. Once combined, pour it over the crust and cover with plastic wrap before refrigerating it again. To maintain quality, ensure the cheesecake is tightly wrapped and stored in the fridge. When you’re ready to serve, simply add your crumbled Biscoff topping and drizzle with extra Biscoff spread for a touch of elegance and deliciousness! Enjoy your effortlessly impressive dessert.

No Bake Biscoff Cheesecake Recipe FAQs
What type of Biscoff cookies should I use?
I recommend using the classic Biscoff cookies for the best flavor, but feel free to experiment with variations like the crunchy or smooth Biscoff spread for the filling.
How do I store my No Bake Biscoff Cheesecake?
Store your cheesecake in an airtight container or wrap it tightly with plastic wrap in the refrigerator for up to 5 days. This keeps it fresh and maintains its creamy texture, ready for you to enjoy!
Can I freeze No Bake Biscoff Cheesecake?
Absolutely! Wrap the cheesecake tightly in plastic wrap or aluminum foil and freeze it for up to 2 months. To thaw, simply place it in the refrigerator for several hours or overnight before serving.
What should I do if my cream cheese is lumpy?
No worries! To avoid lumps, make sure your cream cheese is at room temperature before using it. If you still encounter lumps, beat it longer with a mixer or pass the mixture through a fine sieve to smoothen it out.
Are there any allergy considerations with this recipe?
Yes! This recipe contains dairy (cream cheese and heavy cream) and gluten (Biscoff cookies). If you’re making it for someone with allergies, consider using dairy-free cream cheese and gluten-free cookies as substitutions.
What’s the best way to serve No Bake Biscoff Cheesecake?
Serve it chilled, topped with additional crumbled Biscoff cookies and a drizzle of warm Biscoff spread for a stunning presentation that will surely impress your guests!
No Bake Biscoff Cheesecake That's Creamy and Irresistible
Ingredients
Equipment
Method
- Finely crush 24 Biscoff cookies using a food processor or a rolling pin and set aside.
- Melt 4 tablespoons of unsalted butter and mix with the crushed cookies until it resembles wet sand. Press into a 9-inch springform pan and refrigerate for 15-20 minutes.
- Beat 16 ounces of softened cream cheese in a bowl until smooth, then gradually add 1 cup of powdered sugar and 1 teaspoon of vanilla extract. Mix until well combined.
- Whip 1 cup of heavy cream until stiff peaks form, then gently fold into the cream cheese mixture.
- Warm 1/2 cup of Biscoff spread in the microwave, then drizzle into the mixture and fold gently to create a marbled effect.
- Pour the filling over the chilled crust and smooth the top. Cover and refrigerate for at least 4 hours to set.
- Before serving, top with additional crumbled Biscoff cookies and drizzle with remaining melted Biscoff spread.
Leave a Reply