
As I stood in my kitchen, visions of pastel colors and sweet delights danced around me, whispering that Easter was just around the corner. That’s when I knew I had to whip up something special: Easy No Bake Mini Easter Cheesecakes. These delightful treats are like little gifts of joy, perfect for any festive gathering, and their vibrant layers bring a splash of cheer to your dessert table. With just a few simple ingredients and minimal prep time, these cheesecakes not only please the palate but also make entertaining a breeze. Imagine impressing your friends and family without breaking a sweat! They can even be made ahead and popped into the freezer, leaving you free to enjoy the festivities. So, are you ready to add a burst of color and flavor to your Easter celebration? Let’s dive into this fun recipe!
Why Are These Cheesecakes So Special?
Effortless Creation: With no baking required, these No Bake Mini Easter Cheesecakes offer a hassle-free way to create delightful desserts.
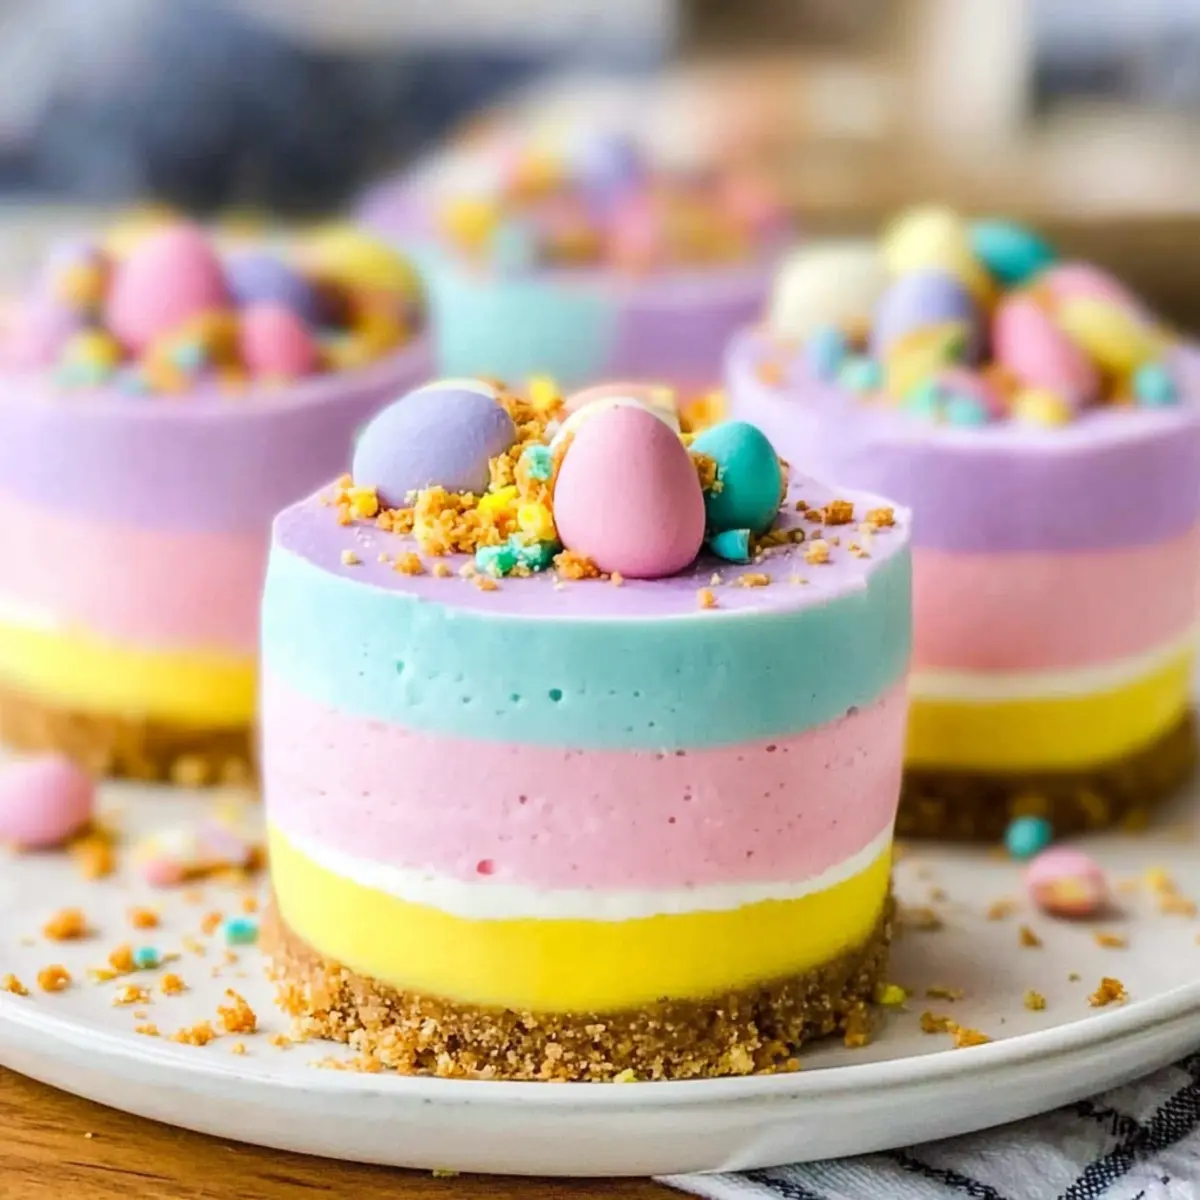
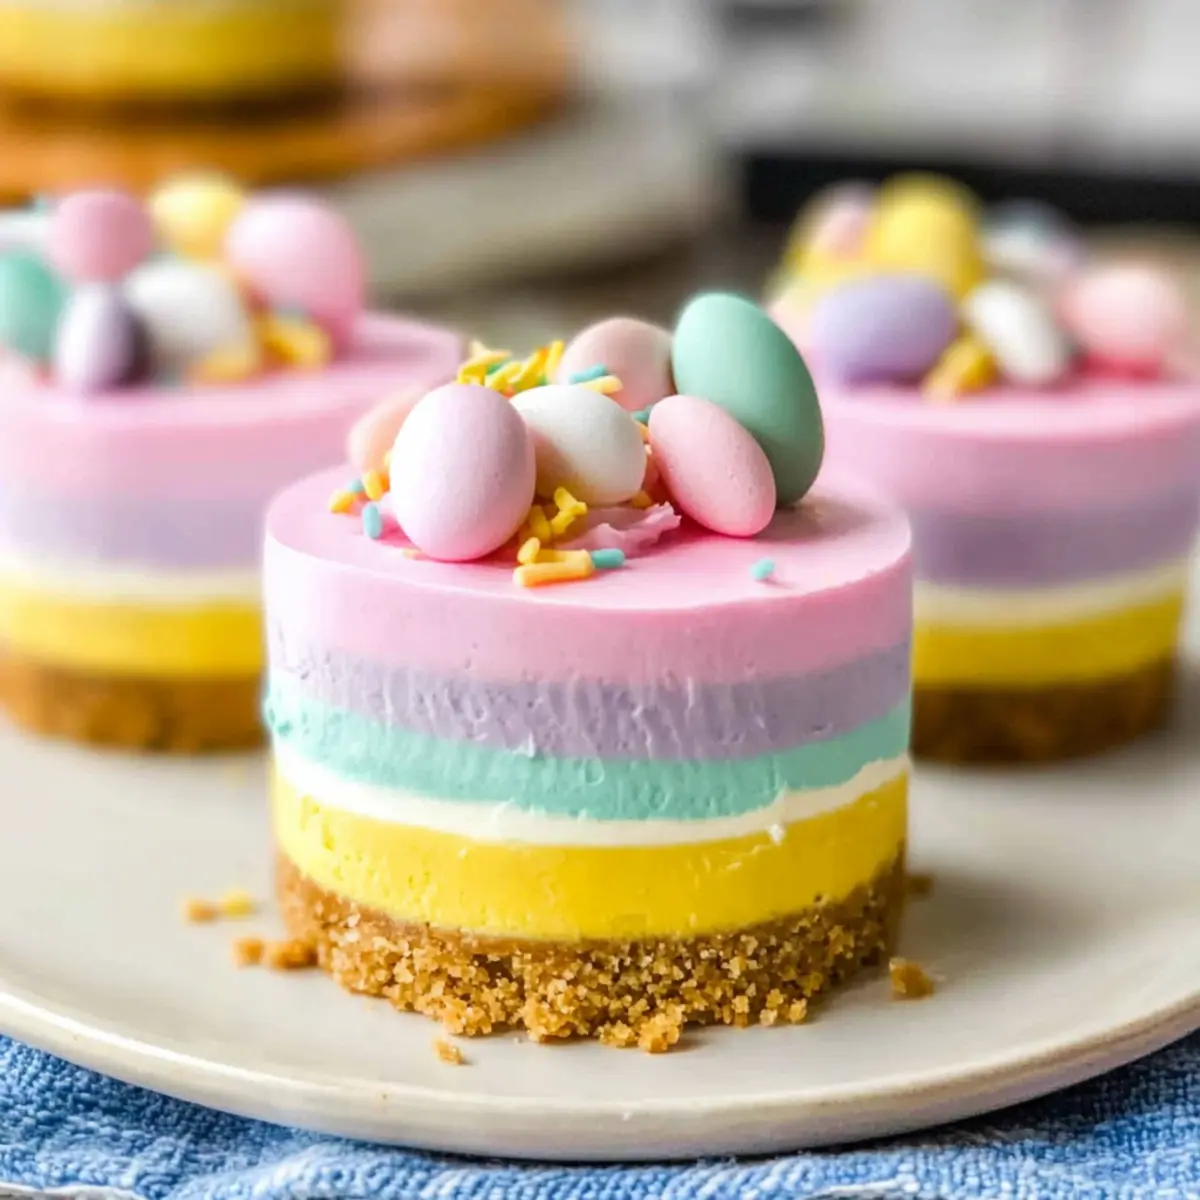
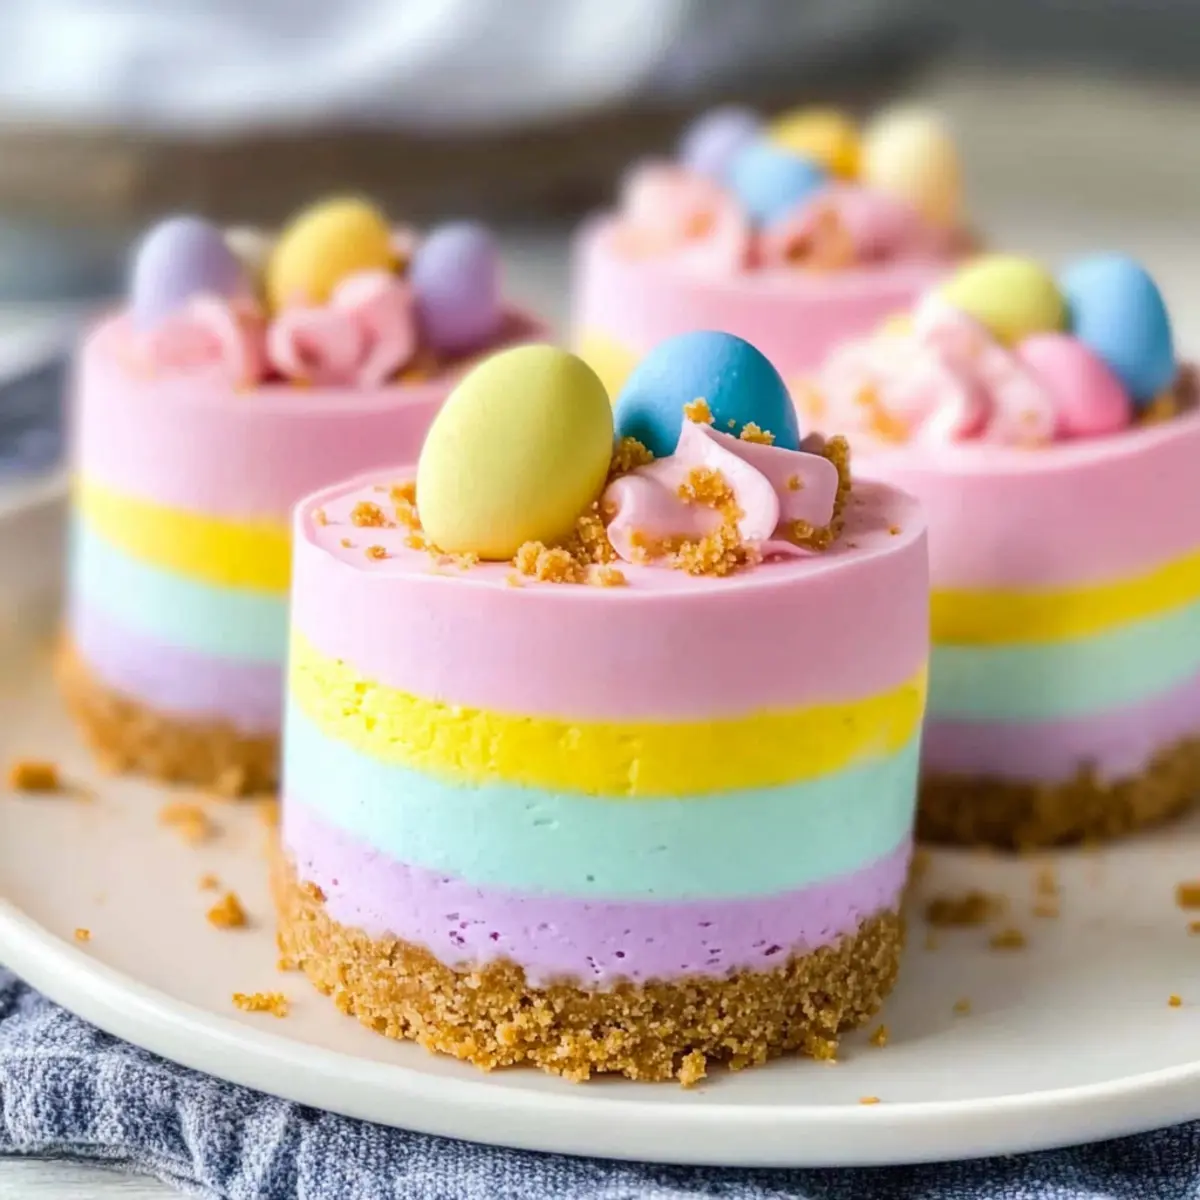
Vibrant Layers: Each cheesecake showcases colorful layers that are not just visually stunning but incredibly fun for festive occasions.
Customizable Flavors: Feel free to experiment with different extracts or colors to match various holidays—making them perfect year-round!
Crowd-Pleaser: These individual servings cater to everyone’s taste, ensuring everyone at your gathering will find a little joy in each bite.
Make Ahead Friendly: Prepare them a day in advance and store them in the freezer for stress-free hosting, just like Egg-Shaped Rice Krispie Treats enhance your dessert table.
Decadent Goodness: The rich, creamy filling paired with a crumbly graham cracker crust creates a satisfying dessert that feels indulgent without being overly complicated.
No Bake Mini Easter Cheesecakes Ingredients
For the Cheesecake Filling
• Heavy Whipping Cream – Adds richness and lightness; use cold for easier whipping.
• Cream Cheese – Provides the creamy base; ensure it’s softened for easier mixing.
• Granulated Sugar – Adds sweetness; can be adjusted to taste.
• Sour Cream – Enhances creaminess and tang; full-fat is preferred for best flavor.
• Vanilla Extract – Adds depth of flavor; opt for high-quality extract for the best results.
• Food Coloring (Pink, Purple, Yellow, Teal) – For vibrant layers; substitute with other colors as desired.
For the Crust
• Graham Cracker Crumbs – Serves as the crust base; can be made from scratch or store-bought.
• Butter – Binds the crust ingredients together; use unsalted for better control of saltiness.
Optional Toppings
• Whipped Cream – Adds an extra layer of creaminess; dollop generously on top!
• Sprinkles – For additional festive flair; choose colors that match your occasion.
• Chocolate Eggs – A whimsical touch for decoration; they also provide a delightful chocolatey surprise!
These No Bake Mini Easter Cheesecakes are not only simple to make but are bursting with flavor and color, ensuring they’ll be the star of any festive gathering.
Step‑by‑Step Instructions for No Bake Mini Easter Cheesecakes
Step 1: Whip the Cream
In a large mixing bowl, take your cold heavy whipping cream and beat it with an electric mixer on high speed until stiff peaks form, which should take about 3-5 minutes. You want to achieve fluffy and airy peaks that hold their shape well. Set aside your whipped cream while you prepare the cream cheese filling.
Step 2: Prepare the Cheesecake Base
In another bowl, combine the softened cream cheese, granulated sugar, sour cream, and vanilla extract. Mix these ingredients with a hand mixer on medium speed until the mixture is smooth and creamy, about 2-3 minutes. The goal is to ensure there are no lumps remaining, leading to a velvety texture in your No Bake Mini Easter Cheesecakes.
Step 3: Combine Mixtures
Gently fold the whipped cream into the cream cheese mixture using a spatula. Be careful not to over-mix; you want to incorporate the whipped cream until just blended, allowing the lightness to remain. This step is crucial to achieving that fluffy consistency that makes your cheesecakes delightful.
Step 4: Color Your Batter
Divide the cheesecake mixture evenly into four small bowls. Add different food coloring to each bowl—pink, purple, yellow, and teal for a vibrant display. Stir each bowl gently to mix in the color until you achieve your desired shades, turning your No Bake Mini Easter Cheesecakes into colorful delights that reflect the festive spirit.
Step 5: Prepare to Layer
Transfer each colored cheesecake mixture into separate ziplock bags and snip off the ends to create piping bags. This will help you layer the colors neatly in the molds. Make sure the bags are sealed tightly to avoid any mess as you pipe the layers into the silicone molds.
Step 6: Pipe the Layers
Starting with your first color, pipe the mixture into the silicone molds, filling each one about a third of the way full. Tap the molds gently on the counter to level out the mixture before switching to the next color. Repeat this process for each layer, creating a beautiful gradient of colors in your No Bake Mini Easter Cheesecakes.
Step 7: Create the Crust
In a separate bowl, mix melted butter with graham cracker crumbs and a dash of sugar until combined. Spoon this mixture over the top of each cheesecake layer, gently pressing it down to form a crust. This sweet, crumbly layer adds texture and counterbalances the creamy filling perfectly.
Step 8: Freeze to Set
Place the filled molds in the freezer and let them chill for 2-4 hours, or until completely set. You’ll know they’re ready when the cheesecakes are firm to the touch. Once set, carefully remove the cheesecakes from the molds, taking care not to damage the colorful layers.
Step 9: Garnish and Serve
Now for the fun part! Decorate your No Bake Mini Easter Cheesecakes with whipped cream, sprinkles, or chocolate eggs for added festive flair. Arrange them on a beautiful dessert platter to showcase their vibrant colors, and they’re now ready to steal the show at your Easter gathering!

How to Store and Freeze No Bake Mini Easter Cheesecakes
Fridge: Keep leftovers in an airtight container in the refrigerator for up to 3 days to maintain their creaminess and vibrant colors.
Freezer: For longer preservation, freeze the cheesecakes in an airtight container for up to 30 days. Ensure they are wrapped well to avoid freezer burn.
Thawing: When ready to enjoy, transfer the frozen cheesecakes to the fridge for about 2-3 hours until softened. Avoid microwaving to preserve their texture.
Garnishing: Re-garnish with whipped cream or chocolate eggs just before serving for that fresh, festive touch, ensuring your No Bake Mini Easter Cheesecakes shine!
What to Serve with Easy No Bake Mini Easter Cheesecakes
Create a delightful feast that pairs beautifully with these little bundles of joy!
- Fresh Berries: The sweet tang of strawberries, blueberries, or raspberries complements the richness of the cheesecakes, adding a refreshing burst of flavor.
- Chocolate-Covered Pretzels: The salty crunch balances the sweetness, creating an irresistible contrast that your guests will love. They’re perfect for nibbling alongside the dessert.
- Whipped Cream Topping: A dollop of freshly whipped cream on each cheesecake adds an extra layer of creaminess, elevating the dessert experience to new heights.
- Easter Bunny Cookies: These playful treats enhance the holiday spirit with their fun designs and flavors, making your dessert spread even more festive.
- Creamy Fruit Salad: A light fruit salad serves as a healthier side, offering a sweet yet fresh flavor that pairs nicely with the cheesecakes’ richness.
- Sparkling Lemonade: This zesty and refreshing drink adds a cheerful twist, making it the perfect beverage pairing for the vibrant flavors of your No Bake Mini Easter Cheesecakes.
- Meringue Kisses: Light and airy, these delightful bites mirror the texture of the cheesecakes, providing a sweet treat that melts in your mouth.
- Chocolate Eggs: Set out a bowl of colorful chocolate eggs as a fun garnish or snack that keeps the festive mood alive throughout your gathering.
No Bake Mini Easter Cheesecakes Variations
Feel free to explore these delightful twists to make your No Bake Mini Easter Cheesecakes even more special!
-
Flavor Boosts: Add extracts like almond or lemon to the cheesecake filling for a surprising twist.
-
Cookie Crust: Swap out graham cracker crumbs for crushed Oreos or other cookies for a different flavor profile. The possibilities are endless, and who doesn’t love a good cookie base?
-
Fruit Swirls: Incorporate fruit purees like raspberry or strawberry within the layers for a fruity burst that sings spring!
-
Dairy-Free: Substitute cream cheese and whipping cream with coconut cream and dairy-free cream cheese for a vegan-friendly version that doesn’t skimp on flavor. You’d be surprised at how creamy it can be!
-
Seasonal Colors: Change food coloring to match themes like red and green for Christmas or pastels for baby showers. Your cheesecakes will always feel fresh!
-
Spicy Kick: Add a dash of cinnamon or nutmeg to the filling for a warm, cozy flavor that beautifully contrasts with the coolness.
-
Texture Twists: Fold in mini chocolate chips or nuts to the filling for added texture, complementing the smoothness with delightful crunch.
-
Garnishing Options: Finish off with caramel drizzle or fruit compote as a topping, turning each mini cheesecake into a masterpiece worthy of celebration!
And for even more festive ideas, you could pair these with a delicious batch of Egg-Shaped Rice Krispie Treats or surprise your guests with Easter Bunny Cookies for a dessert spread that truly celebrates the spirit of Easter!
Make Ahead Options
These Easy No Bake Mini Easter Cheesecakes are perfect for meal prep, allowing you to enjoy the festivities without the kitchen chaos! You can prepare the cheesecake filling and layer it into the molds up to 24 hours in advance—just freeze them until set. If you’re pressed for time, consider making the graham cracker crust ahead of time as well, storing it separately in an airtight container for up to 3 days. When you’re ready to serve, simply remove the cheesecakes from the freezer and let them thaw in the fridge for a couple of hours. This way, they will taste just as delightful as if made fresh!
Expert Tips for No Bake Mini Easter Cheesecakes
• Use Cold Cream: Ensure your heavy whipping cream is extra cold to achieve maximum volume when whipped, making your cheesecakes light and fluffy.
• Gentle Mixing: Be careful not to over-mix the whipped cream into the cream cheese filling; this helps maintain the airy texture that makes your No Bake Mini Easter Cheesecakes delightful.
• Silicone Molds: Opt for silicone molds which are perfect for easy removal after freezing, ensuring your colorful layers stay intact and beautiful.
• Layer Tapping: When layering the colors, tap the molds gently on the counter; this helps eliminate air bubbles and creates smooth, even layers.
• Chill Time: Allow enough time for your cheesecakes to freeze completely—aim for at least 2-4 hours to ensure they hold their shape when served.
Easy No Bake Mini Easter Cheesecakes Recipe FAQs
How do I choose ripe ingredients for the cheesecake?
Absolutely! For the best flavor and texture, select a cream cheese that is fully softened to room temperature, which makes mixing a breeze. When it comes to heavy whipping cream, fresh is always best—look for a product with a near expiration date for maximum freshness.
How should I store my cheesecakes?
Very good question! You can keep your No Bake Mini Easter Cheesecakes in an airtight container in the refrigerator for up to 3 days. This ensures they retain that creamy richness. If you have leftovers, simply pop them in the freezer where they’ll be good for up to 30 days—just make sure they’re sealed tightly to prevent freezer burn!
Can I freeze these cheesecakes? If so, how?
Yes, you can! Begin by placing the cheesecakes in an airtight container, making sure to use wax paper between layers if you’re stacking them. They’ll freeze well for up to 30 days. When you’re ready, move them to the refrigerator and let them thaw for 2-3 hours for the best texture. Avoid microwave defrosting to keep that lovely, creamy consistency intact!
What should I do if my whipped cream isn’t forming stiff peaks?
Oh, that can happen! Ensure your heavy whipping cream is extremely cold before you start. Use a clean bowl and whip it for 3-5 minutes on high speed; if it’s still not forming. Try not to over-beat it as this can lead to a grainy texture. If you need extra stability, consider adding a tablespoon of powdered sugar or cornstarch to help stabilize it during whipping.
Are there any dietary considerations I should keep in mind?
Definitely! These cheesecakes contain dairy, so if anyone has lactose intolerance, consider alternatives like lactose-free cream cheese and whipping cream. For those with allergies, always check that your graham crackers are nut-free and dairy-free if necessary. You could even explore vegan options using coconut cream and plant-based alternatives for a delicious twist!
Can I customize the flavors of these cheesecakes?
The more the merrier! Feel free to experiment with different extracts—like almond or lemon—for an added layer of flavor. You can also swap out the graham cracker crust for crushed gluten-free cookies or even a cookie crust made with Oreos! Just adjust it to fit your tastes or dietary preferences.
Delightful No Bake Mini Easter Cheesecakes You’ll Love
Ingredients
Equipment
Method
- In a large mixing bowl, beat the cold heavy whipping cream on high speed until stiff peaks form, about 3-5 minutes. Set aside.
- In another bowl, combine the softened cream cheese, granulated sugar, sour cream, and vanilla extract. Mix until smooth, about 2-3 minutes.
- Gently fold the whipped cream into the cream cheese mixture until just blended.
- Divide the mixture into four bowls and add food coloring to each for vibrant layers.
- Transfer the colored mixtures into separate ziplock bags and snip off the ends for piping.
- Pipe the mixtures into silicone molds, filling each one about a third full, and level the mixture.
- Mix melted butter with graham cracker crumbs and a dash of sugar. Spoon over the cheesecake layers and press down.
- Freeze the molds for 2-4 hours until set. Carefully remove the cheesecakes from the molds.
- Garnish with whipped cream, sprinkles, or chocolate eggs before serving.
Leave a Reply