
There’s a unique thrill that comes from crafting a dessert that feels like a special treat yet is almost effortlessly easy to prepare. Enter the world of Light and Luscious Lemon Pudding Cakes, where a light, airy cake layer meets a silky, luscious pudding beneath in a perfect balance of textures and flavors. This quick and easy dessert transforms simple ingredients into an elegant dish that’s as delightful to serve as it is to savor. In just 20 minutes of prep time, you’ll have a guilt-free, citrus-infused delight that can impress guests or satisfy an afternoon craving. With the refreshing zing of lemon and the comforting softness of pudding, who could resist? Are you ready to elevate your dessert game with this irresistible recipe?

Why are Lemon Pudding Cakes so irresistible?
Effortless Preparation: With just 20 minutes of prep time, you can whip up these delightful cakes without breaking a sweat.
Guilt-Free Decadence: Indulge in a dessert that feels rich and luxurious yet is surprisingly light! Perfect for those watching their calorie intake.
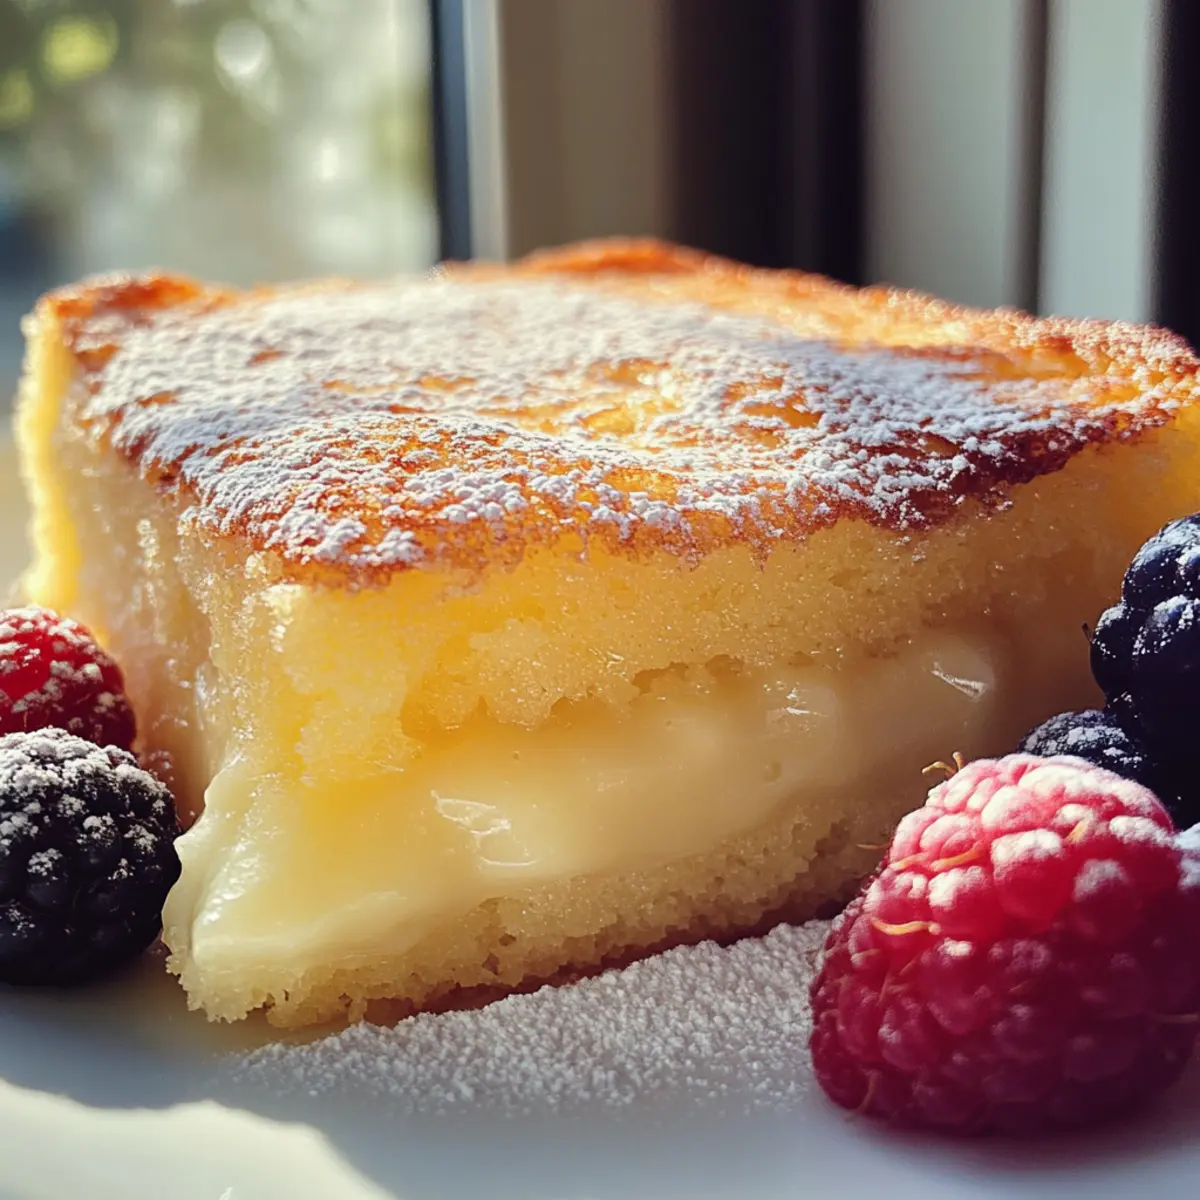
Unique Textures: The airy cake atop a creamy pudding creates a beautiful contrast that melts in your mouth with every spoonful.
Citrus Bliss: Fresh lemon zest and juice infuse vibrant flavor, making each bite refreshing and bright.
Versatile Serving Options: Dress them up with fresh berries or powdered sugar, or enjoy them simply for an easy weeknight treat. This recipe is sure to impress friends and family alike! For more delightful dessert options, check out my Delicious Citrus Desserts.
Lemon Pudding Cakes Ingredients
For the Cake Mixture
- Large Eggs – These provide structure and moisture; egg substitutes can change texture, so choose wisely.
- Milk – Adds creaminess; low-fat or whole milk work well, but non-dairy alternatives may alter the pudding’s consistency.
- Lemon Zest – Fresh zest is essential for the best flavor; substitute lime zest for a different citrus twist.
- Fresh Lemon Juice – This is crucial for that zesty citrus flavor; bottled juice is a backup, but fresh is always preferred.
- Unsalted Butter – Adds richness; you can swap in coconut oil for a dairy-free version.
- Salt – Enhances flavor; don’t skip this step for a balanced taste.
- All-Purpose Flour – Provides structure; for gluten-free options, use a 1:1 gluten-free flour substitute.
- Sugar – Sweetens the dessert; feel free to adjust to your liking or use a lower-calorie sweetener if desired.
For Serving
- Fresh Berries – These add a refreshing contrast; they are optional but highly recommended for a pop of color.
- Confectioners’ Sugar – A light dusting provides a sweet finish; you can skip it for an even lighter dessert option.
With these Lemon Pudding Cakes ingredients, you’re set to create a dessert that’s both delightful and guilt-free! Happy baking!
Step‑by‑Step Instructions for Lemon Pudding Cakes
Step 1: Preheat and Prepare Ramekins
Begin by preheating your oven to 350°F (175°C). While the oven heats up, prepare six 6-ounce ramekins by generously spraying them with nonstick cooking spray. This will help ensure your Lemon Pudding Cakes release easily once baked. Set the ramekins aside on a baking sheet for easier handling later.
Step 2: Whisk the Egg Yolk Mixture
In a large mixing bowl, whisk together the egg yolks, milk, lemon zest, fresh lemon juice, melted unsalted butter, salt, and all-purpose flour until you achieve a smooth and uniform batter. This mixture creates the delightful foundation of your Lemon Pudding Cakes, so be sure to incorporate all ingredients fully. This step should take about 3-5 minutes.
Step 3: Beat the Egg Whites
In a separate clean bowl, use an electric mixer to beat the egg whites until soft peaks form. This process can take around 3-5 minutes. You’ll know they’re ready when the whites are glossy and hold a soft peak that curls over when the beaters are lifted. This step adds lightness to your cakes, so make sure not to overbeat.
Step 4: Fold in Egg Whites
Gently fold a small portion of the beaten egg whites into the lemon yolk mixture to lighten it. This initial incorporation helps increase airiness. After that, carefully fold in the remaining egg whites until no streaks remain, taking care to maintain the fluffy texture. This step is essential for the elegance of your Lemon Pudding Cakes, giving them their signature airy feel.
Step 5: Fill Ramekins and Create a Water Bath
Using a ladle or a measuring cup, fill each prepared ramekin with the batter about three-quarters full. Place the ramekins into a 9-by-13-inch baking dish, ensuring they fit snugly. Carefully add hot water to the dish, filling it until it reaches halfway up the sides of the ramekins. This water bath will help cook the cakes evenly, preventing them from cracking during baking.
Step 6: Bake the Cakes
Transfer the baking dish to the preheated oven and bake for about 45 minutes. The cakes should puff up beautifully and turn a light golden color on top when they’re ready. Keep an eye on them as they bake; they will create a delightful aroma that fills your kitchen!
Step 7: Cool and Serve
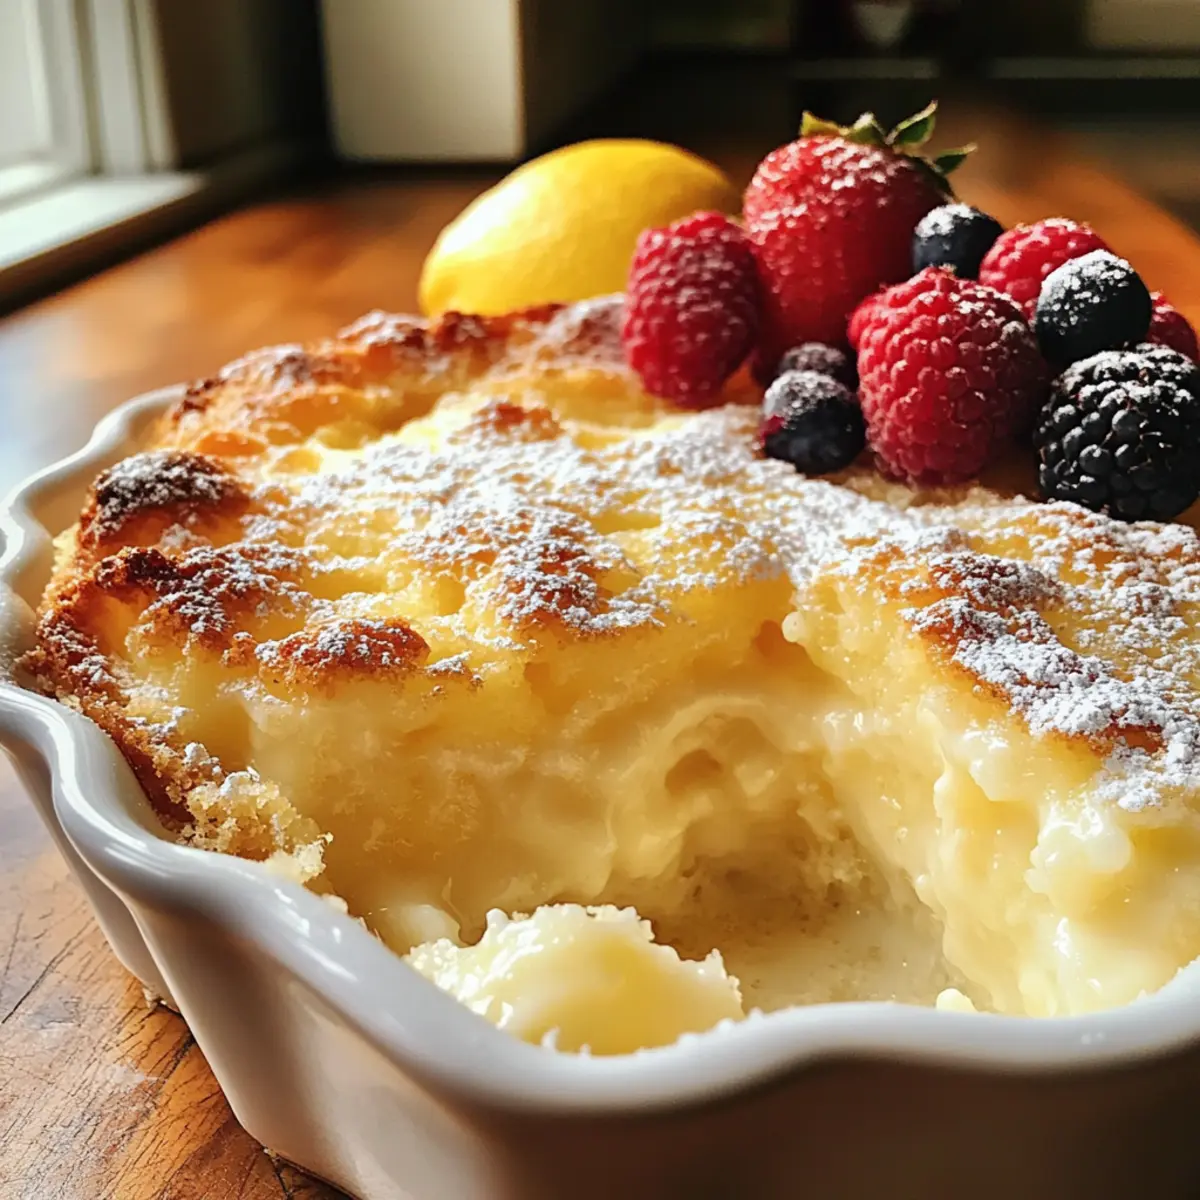
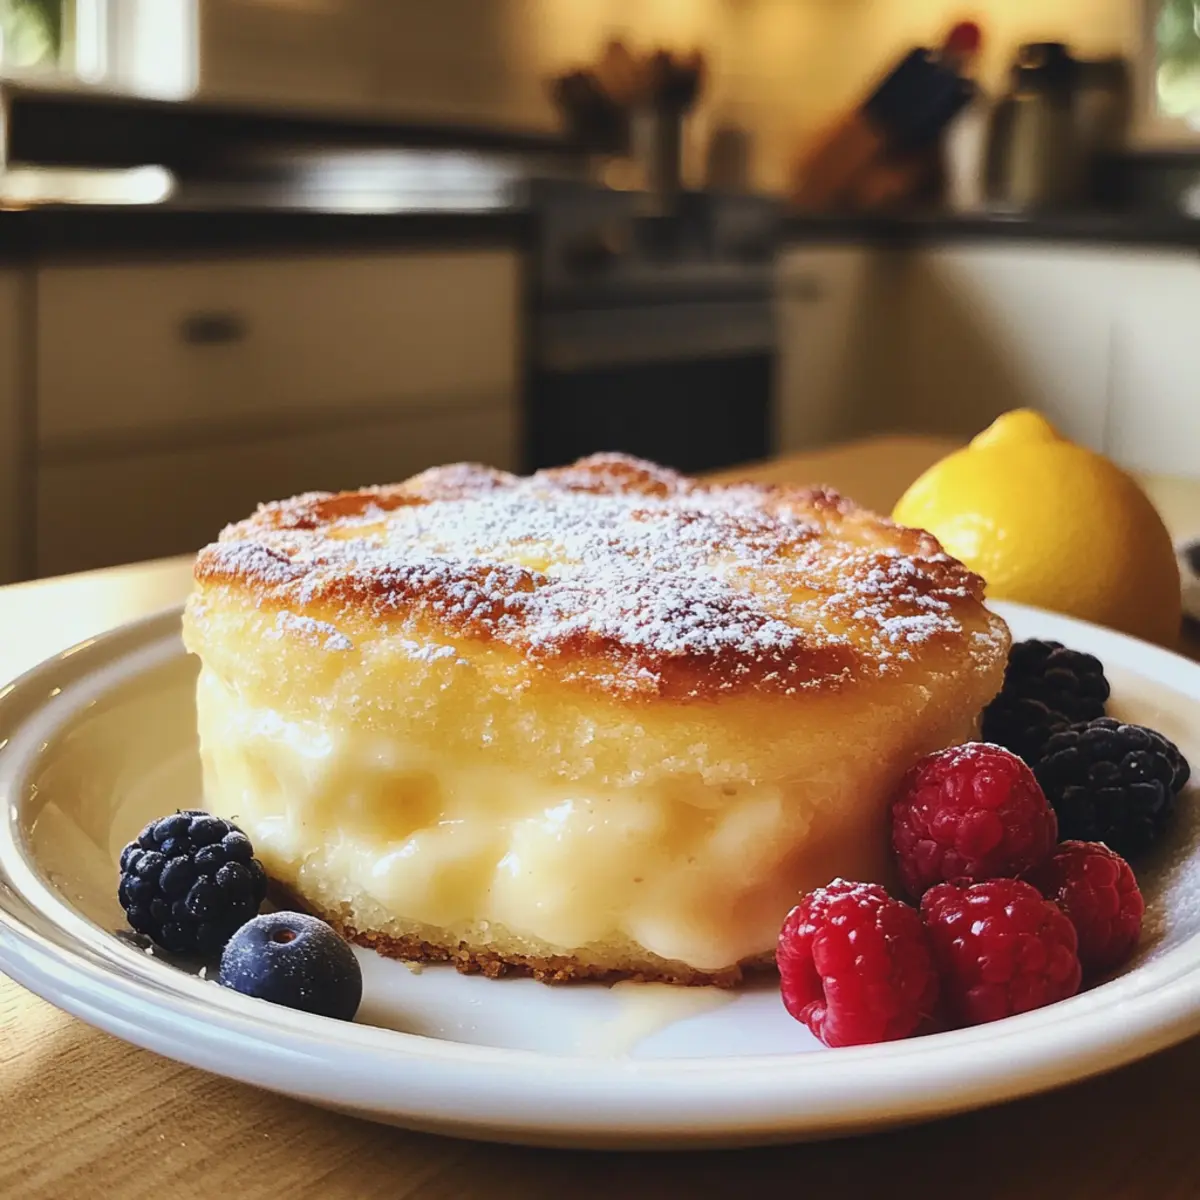
After baking, carefully remove the ramekins from the water bath using tongs or a hot pad. Allow the Lemon Pudding Cakes to cool for about 20 minutes on a wire rack before serving. For an elegant touch, dust the tops with confectioners’ sugar and garnish with fresh berries if desired. Serve them warm for the best texture and flavor experience!
Make Ahead Options
These Light and Luscious Lemon Pudding Cakes are perfect for meal prep, allowing you to enjoy the delightful flavors with minimal hassle during busy weeknights! You can prepare the lemon batter up to 24 hours in advance, storing it in the refrigerator covered tightly. To do this, follow the preliminary steps until the mixing stage, then pour the batter into the ramekins and refrigerate instead of baking. When you’re ready to serve, simply preheat your oven, add hot water to the baking dish, and bake as instructed. This method ensures the cakes are just as delicious and fluffy, providing a refreshing dessert option with little effort on the day you plan to enjoy them!
What to Serve with Lemon Pudding Cakes?
A delightful dessert deserves delightful companions to create a memorable dining experience.
- Fresh Berries: Topped with vibrant strawberries, blueberries, or raspberries for a refreshing burst of flavor and color that contrasts beautifully with the creamy pudding.
- Whipped Cream: A dollop of lightly sweetened whipped cream adds a luscious finish that pairs perfectly with the tartness of lemon.
- Powdered Sugar: A light dusting on top adds a touch of sweetness and elegance, transforming your dessert into a refined treat.
- Mint Leaves: A sprig of fresh mint not only brightens the plate visually but also introduces a refreshing herbal note that complements the citrus beautifully.
- Coffee or Tea: A warm cup of coffee or herbal tea offers a soothing contrast to the bright lemon flavors, perfect for ending a meal on a cozy note.
- Light Dessert Wine: Pairing with a sweet Riesling or Moscato enhances the dessert experience, creating a wonderful harmony with the zesty lemon.
- Almond Biscotti: These crunchy bites add a delightful texture and nutty flavor that contrasts with the soft pudding while complementing the lemony zest.
- Meringue Cookies: Light and airy meringue cookies offer a playful twist that echoes the lightness of the pudding cakes, making them an enjoyable addition to the dessert.
How to Store and Freeze Lemon Pudding Cakes
Fridge: Keep any leftover lemon pudding cakes stored in an airtight container in the fridge for up to 2 days. Though delicious when fresh, they’ll still be tasty cold!
Freezer: If you’d like to savor these cakes later, freeze them before dusting with powdered sugar. Wrap each ramekin tightly in plastic wrap and aluminum foil; they can be stored for up to 2 months.
Thawing: To enjoy frozen lemon pudding cakes, transfer them to the fridge for several hours or overnight to thaw before serving.
Reheating: Gently reheat in the microwave for about 30 seconds until warmed through. Avoid overcooking to preserve the delicate texture of your lemon pudding cakes.
Expert Tips for Lemon Pudding Cakes
-
Room Temperature Ingredients: Ensure all ingredients, especially eggs and milk, are at room temperature. This helps create the best emulsion and rise in your lemon pudding cakes.
-
Don’t Overbeat Egg Whites: When beating egg whites, aim for soft peaks that curl over when lifted. Overbeating can lead to a dry texture, so stop mixing as soon as they reach the right consistency.
-
Proper Water Bath: The water bath is essential for even cooking and to prevent the cakes from cracking. Always add hot water halfway up the sides of the ramekins before baking.
-
Cooling Process: Allow the cakes to cool as described; they will naturally sink a bit. This is normal, and it adds to the charming texture of your lemon pudding cakes.
-
Experiment with Flavors: Feel free to mix it up! Adding a touch of vanilla extract or using different citrus juices can enhance the flavor profile and offer a delightful twist.
Lemon Pudding Cakes Variations & Substitutions
Feel free to get creative with these delightful lemon pudding cakes, enhancing flavors and textures just the way you like!
-
Dairy-Free: Substitute milk and butter with your favorite plant-based options like almond milk and coconut oil for a creamy, dairy-free delight.
-
Gluten-Free: Use a 1:1 gluten-free flour blend instead of all-purpose flour, ensuring everyone can enjoy this treat without worry.
-
Citrus Twist: Swap lemon juice and zest with lime or orange for a vibrant alternative that still packs a citrus punch. It’s an exciting way to surprise your taste buds!
-
Sweetener Alternative: For a lower sugar option, try honey or a sugar substitute. Adjust the quantity to taste, keeping the cake’s sweetness balanced.
-
Add Vanilla: Adding a dash of vanilla extract to the batter can elevate the flavor profile, giving the cakes a hint of warmth amidst the citrusy brightness.
-
Berry Infusion: Mix fresh berries into the batter before baking for a burst of fruity flavor in every bite! Blueberries or raspberries would be a delightful addition.
-
Chocolate Drizzle: For chocolate lovers, drizzling melted dark chocolate on top before serving can create a decadent twist that balances well with lemon’s tartness.
-
Herb Infusion: Experiment with a bit of finely chopped fresh rosemary or mint folded gently into the mixture. This twist adds unique depth and freshness to your dessert!
With these variations, your lemon pudding cakes can become an endless array of delights! If you’re looking for more inspiration, don’t forget to check out my delicious citrus desserts for a burst of freshness.
Lemon Pudding Cakes Recipe FAQs
How do I choose the right lemons for this recipe?
Absolutely! Look for firm, bright-yellow lemons that feel heavy for their size. The zest is essential, so choose lemons with a smooth skin without dark spots; this indicates freshness. Ideally, select organic lemons when you can, as they tend to have a more pronounced flavor and aroma.
How long can I store leftover lemon pudding cakes?
You can store leftover lemon pudding cakes in the refrigerator covered with plastic wrap or in an airtight container for up to 2 days. They still maintain delightful flavors when chilled, but are best enjoyed fresh for the best texture experience. Just remember to allow them to come to room temperature before serving for optimal enjoyment.
Can I freeze lemon pudding cakes? If so, how?
Very! To freeze, wrap each ramekin tightly in plastic wrap followed by aluminum foil, ensuring no moisture escapes. This method helps preserve the cake’s delicate texture. They can safely be stored in the freezer for up to 2 months. When you’re ready to enjoy, thaw them in the refrigerator overnight, and then gently reheat them in the microwave for about 30 seconds.
Why did my lemon pudding cakes crack during baking?
Commonly, cracking happens if the oven temperature is too high or if there’s not enough water in the baking dish for the water bath. Make sure to preheat your oven correctly and check the water level halfway during baking. If they sink a bit as they cool, don’t worry—this is part of their charm!
Are there any allergy considerations for this recipe?
Yes! This recipe contains eggs and dairy (milk and butter), so be mindful of any allergies. For a dairy-free option, coconut oil can replace the butter, and non-dairy milk can be used. If needed, egg substitutes can also work, but be aware that they might change the cake’s texture slightly.
Can these cakes be made vegan?
Absolutely! To make a vegan version, substitute the eggs with one of the following: 1/4 cup unsweetened applesauce or 1 tablespoon of flaxseed meal mixed with 2.5 tablespoons of water for each egg. Use a plant-based milk and coconut oil for richer flavor. They may not rise as much as with traditional eggs, but they’ll still turn out delightful!
Delightfully Light Lemon Pudding Cakes for Guilt-Free Indulgence
Ingredients
Equipment
Method
- Preheat your oven to 350°F (175°C) and prepare six 6-ounce ramekins by spraying them with nonstick cooking spray.
- In a large mixing bowl, whisk together the egg yolks, milk, lemon zest, fresh lemon juice, melted unsalted butter, salt, and all-purpose flour until smooth.
- In a separate bowl, use an electric mixer to beat the egg whites until soft peaks form, about 3-5 minutes.
- Gently fold a small portion of the beaten egg whites into the lemon yolk mixture to lighten it, then fold in the remaining egg whites until no streaks remain.
- Fill each prepared ramekin with the batter about three-quarters full and place them in a baking dish. Add hot water to the dish halfway up the sides of the ramekins.
- Bake for about 45 minutes until puffed and golden on top. Keep an eye on them while baking.
- Carefully remove the ramekins from the water bath and allow them to cool for about 20 minutes before serving. Optionally, dust with confectioners' sugar and garnish with fresh berries.
Leave a Reply