
As I unwrapped my favorite candy bar one afternoon, a wave of nostalgia washed over me. Remember when sweets didn’t come with a side of guilt? That’s exactly what inspired me to create these Healthy Twix Bars—a modern twist on a classic favorite without the gluten, dairy, or refined sugar. This recipe not only satisfies a sweet tooth but also delivers wholesome ingredients that make dessert feel like a healthy choice. Plus, these decadent bars come together in just a few simple steps, perfect for busy afternoons or impressing guests. Are you ready to dive into this healthier indulgence that your taste buds won’t want to miss?
Why Are Healthy Twix Bars So Tempting?
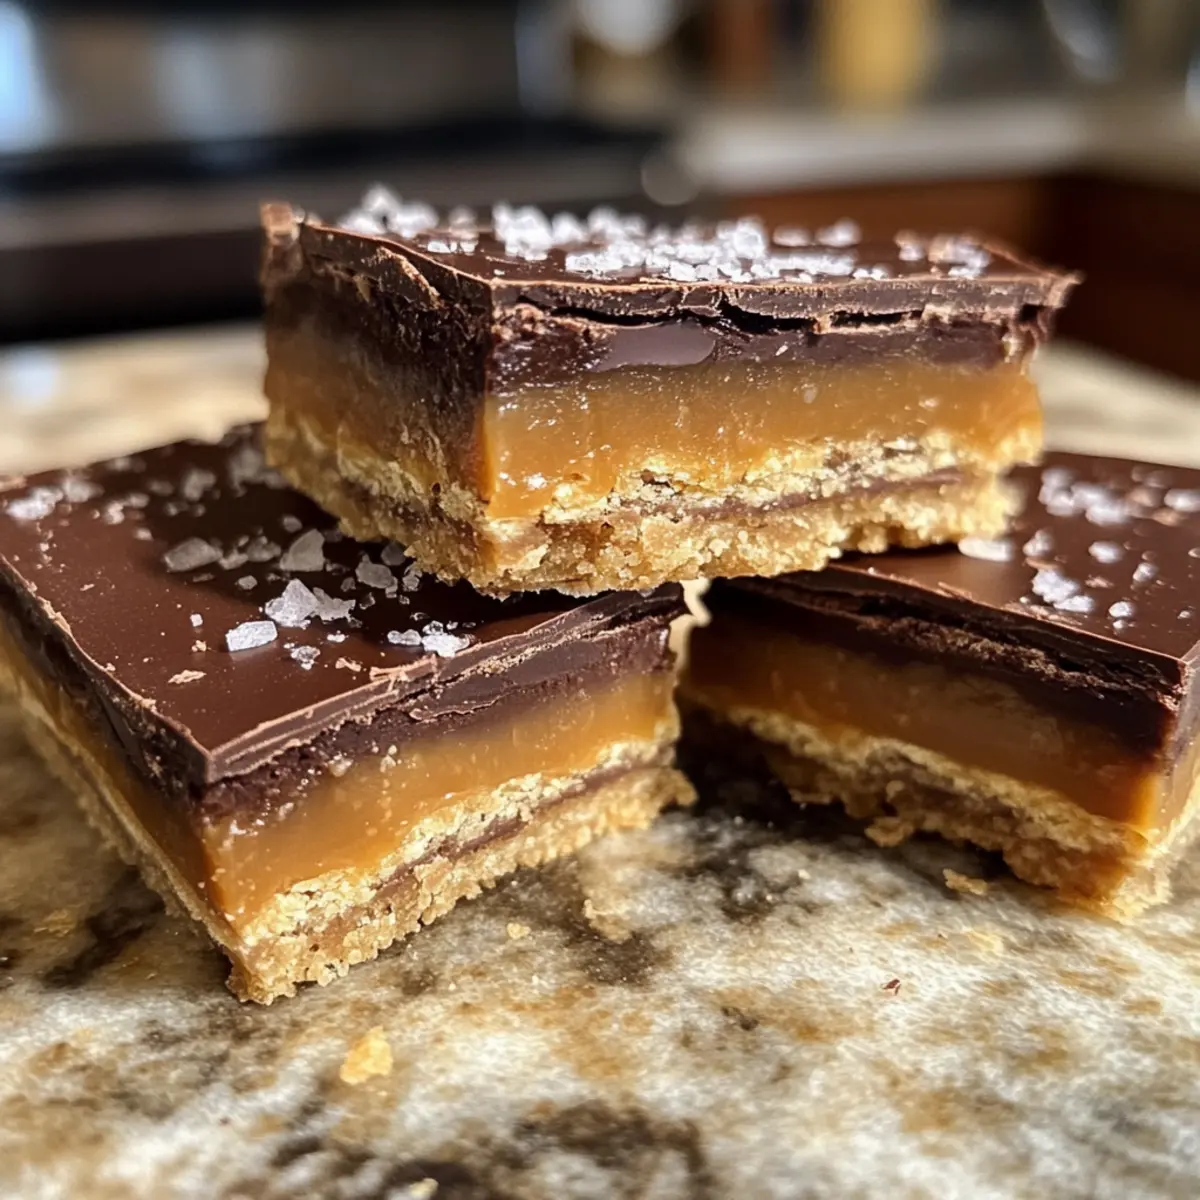
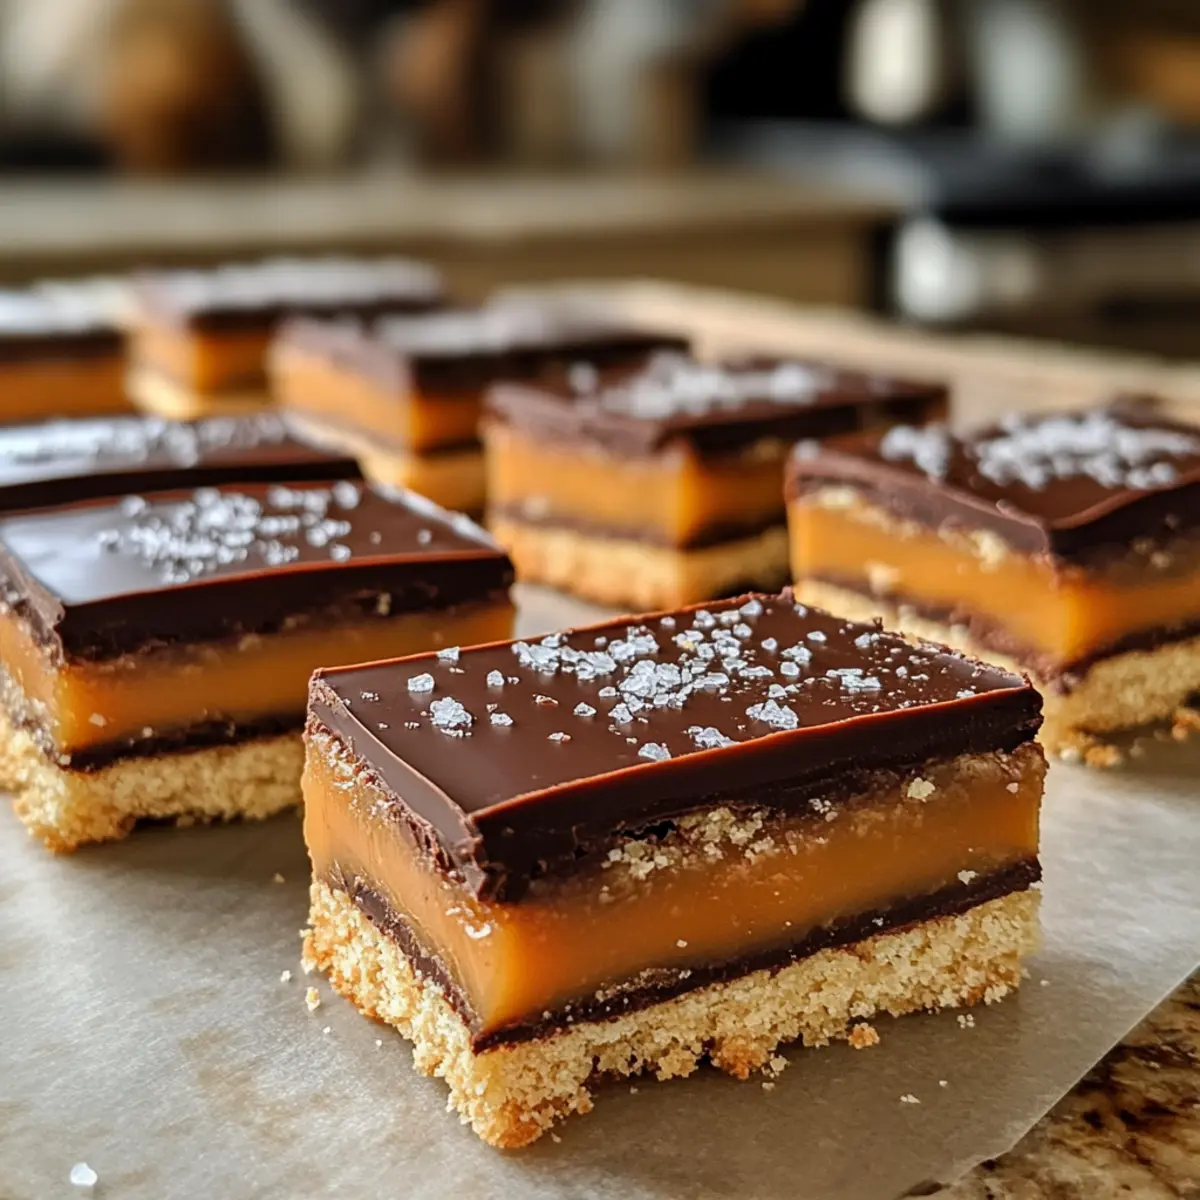
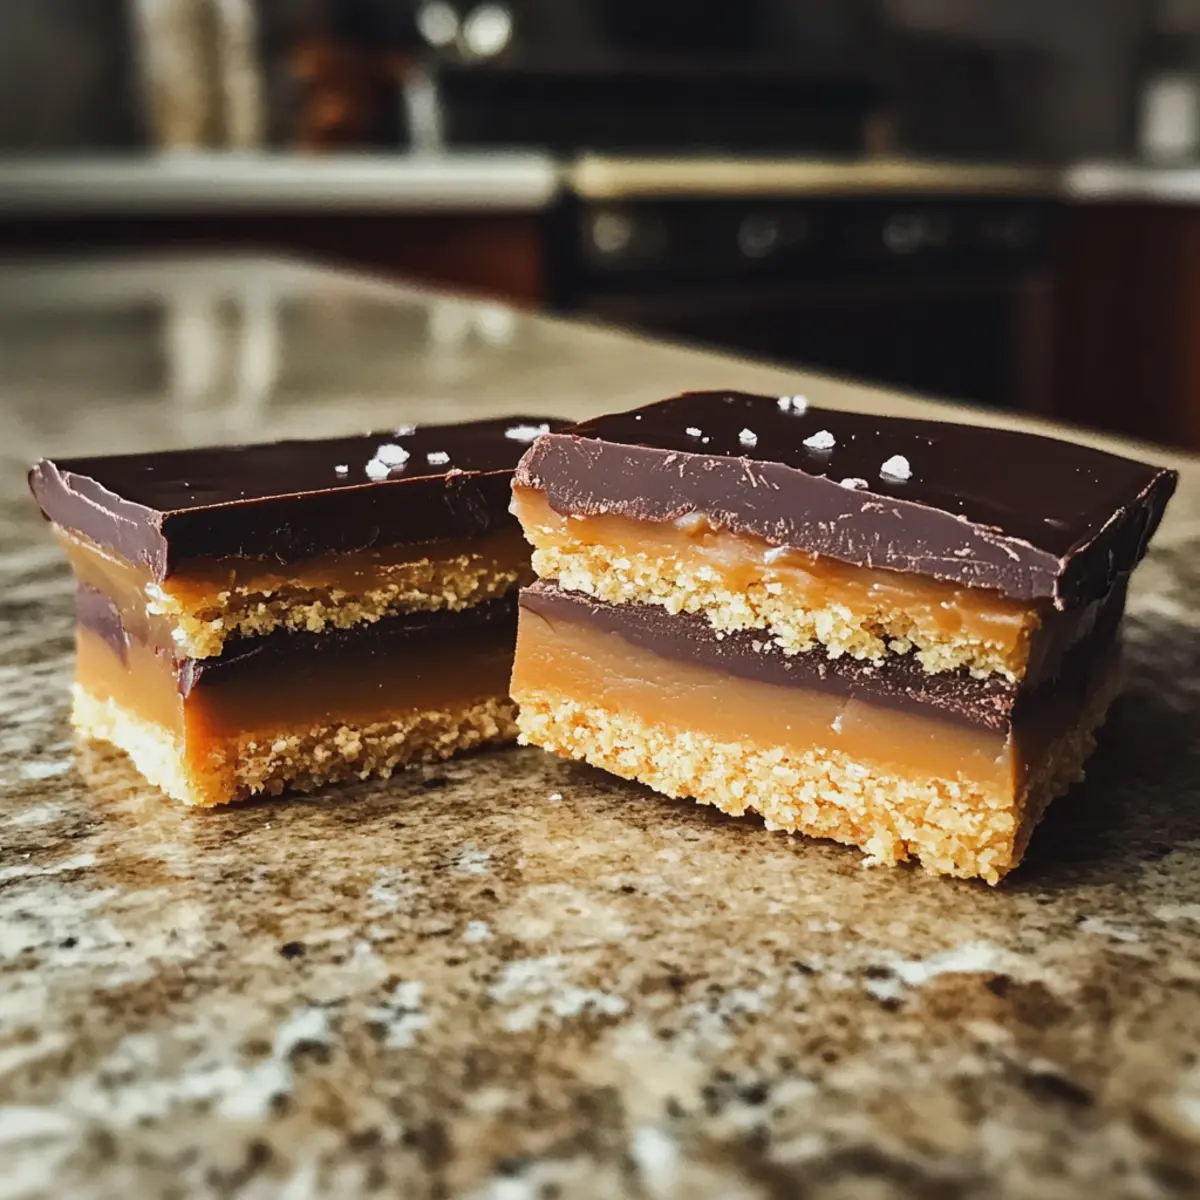
Decadent Layers: Indulge in the irresistible blend of smooth caramel, crunchy shortbread, and rich chocolate that will have your taste buds dancing.
Guilt-Free Indulgence: Enjoy every bite knowing these bars are gluten-free, dairy-free, and refined sugar-free, making them perfect for a healthy dessert.
Customizable Twist: Make them your own by swapping almond butter for peanut butter or experimenting with different types of chocolate.
Quick and Easy: In just a few simple steps, you can create a delightful treat for family gatherings or a personal snack stash.
Crowd-Pleasing Treat: With their rich flavor and wholesome ingredients, these bars are bound to be a hit among friends and family. Pair them with your favorite coffee or tea for an extra touch of comfort! Enhance your experience with storage tips to keep them fresh!
Healthy Twix Bars Ingredients
For the Shortbread Layer
• Coconut Flour – Provides structure and fiber; can substitute with almond flour or oat flour.
• Almond Flour – Adds moisture and nuttiness; may substitute with almond meal for a similar texture.
• Coconut Oil (melted) – Acts as a binding agent and adds richness; can be replaced with vegan butter if preferred.
• Honey (warmed) – Serves as the natural sweetener; maple syrup can be substituted for a vegan option.
For the Caramel Layer
• Almond Butter – Provides the creamy caramel layer; can be substituted with peanut butter or sunflower seed butter for variations.
• Vanilla Extract – Enhances flavor; no substitution needed.
• Maple Syrup – Adds sweetness to the caramel; can be replaced with agave syrup.
• Sea Salt – Balances sweetness; ensure it’s a fine grind for even flavoring.
For the Chocolate Coating
• Dark Chocolate Bar or Chocolate Chips – For the chocolate coating; aim for dairy-free chocolate for a fully dairy-free recipe.
• Coconut Oil (for chocolate) – Aids in chocolate melting and gives a glossy finish; can substitute with vegetable oil if needed.
• Flakey Sea Salt (for garnish) – Enhances texture and flavor; no substitute recommended.
Enjoy creating your Healthy Twix Bars and indulge in the delightful flavors without any guilt!
Step‑by‑Step Instructions for Healthy Twix Bars
Step 1: Preheat the Oven
Begin by preheating your oven to 350°F (175°C). This crucial step ensures that your Healthy Twix Bars will bake evenly. While the oven heats, prepare your baking dish by lining it with parchment paper, allowing for easy removal of the bars once they’re set.
Step 2: Prepare the Shortbread Layer
In a mixing bowl, combine coconut flour, almond flour, melted coconut oil, and warmed honey. Use a spatula to mix until everything is well integrated into a slightly sticky dough. Transfer this mixture into the lined 6×6-inch baking dish, pressing it firmly to form an even layer. Bake for 10-12 minutes, or until it turns golden brown. Allow it to cool completely in the dish.
Step 3: Make the Caramel Layer
While the shortbread cools, prepare the creamy caramel. In a medium saucepan over medium-low heat, whisk together almond butter, coconut oil, vanilla extract, maple syrup, and sea salt. Continue stirring until the mixture becomes smooth and liquified, approximately 5-7 minutes. Once ready, remove from heat and let it cool completely before pouring it over the shortbread layer.
Step 4: Melt the Chocolate
For the chocolate coating, break your dark chocolate into small pieces and place them in a microwave-safe bowl. Add coconut oil to the bowl, and microwave in 30-second intervals, stirring in between until the mixture is completely melted and glossy. This process should take about 1-2 minutes total. Ensure that no chocolate bits are left unmelted for a smooth finish on your Healthy Twix Bars.
Step 5: Assemble the Bars
Once the caramel layer has cooled and the chocolate is melted, pour the cooled caramel evenly over the shortbread layer, smoothing it with a spatula for an even coverage. Place the assembled bars in the freezer for 1-2 hours until the caramel solidifies completely. This step is crucial for achieving that firm, delicious texture.
Step 6: Top with Chocolate and Serve
After the caramel has set, remove the bars from the freezer and drizzle the melted chocolate over the top, spreading it evenly. Sprinkle with flakey sea salt to enhance the flavor. Return to the fridge for an additional 5-10 minutes, allowing the chocolate to harden. Once set, use the parchment paper to lift the Healthy Twix Bars from the dish, slice them into desired portions, and enjoy!
Healthy Twix Bars Variations & Substitutions
Feel free to get creative by customizing these Healthy Twix Bars with these delightful variations that will tantalize your taste buds!
- Nut-Free: Substitute almond butter with sunflower seed butter for a nut-free version that’s just as creamy and delicious. Enjoy the extra nutty flavor without the nuts!
- Sugar-Free: For a lower sweetness option, consider using stevia or erythritol instead of honey or maple syrup. This alternative keeps your bars healthy without sacrificing taste.
- Chunky Caramel: Fold in small bits of your favorite nuts into the caramel layer before pouring it over the shortbread. This adds a delightful crunch to your bars that will keep you coming back for more.
- Coconut Flour Swap: If coconut flour is not your preference, you can use almond flour or oat flour instead, giving a different texture to the shortbread while still keeping it gluten-free.
- Flavor Boost: Enhance the chocolate flavor by adding a splash of espresso or strong coffee to the melted chocolate mixture. This pairs beautifully with the caramel for an indulgent experience.
- Chili Chocolate: For those who love a bit of heat, mix a pinch of cayenne pepper or chili powder into the melted chocolate. This spicy twist creates an exciting flavor contrast that adventurous eaters will appreciate.
- Vegan Twist: To make this recipe fully vegan, swap the honey for maple syrup and ensure the chocolate used is dairy-free. You won’t miss the dairy with these enticing flavors!
- Fruit Infusion: Add a layer of finely chopped dried fruits, like dates or figs, into the shortbread layer before baking to introduce a fruity flavor that works wonderfully with the caramel.
For more delightful ways to elevate your experience, check out my tips for storage or consider pairing your bars with a lovely cup of coffee or tea for the perfect snack!
What to Serve with Healthy Twix Bars
Elevate your dessert experience by pairing these delicious bars with complementary flavors and textures that delight all the senses.
-
Creamy Coconut Yogurt: This silky yogurt adds a refreshing creaminess that perfectly balances the richness of the bars. Spoon it on top or serve alongside for a delightful dip.
-
Fresh Berries: The tartness of mixed berries like raspberries and strawberries contrasts beautifully with the sweetness, bringing a burst of freshness with every bite.
-
Nutty Granola: A sprinkle of crunchy granola provides a satisfying contrast to the smooth layers of the bars, making each mouthful a delightful play of textures.
-
Rich Espresso: Pair these treats with a bold shot of espresso. The coffee’s bittersweet notes enhance the chocolate and caramel flavors, creating a decadent experience.
-
Chilled Almond Milk: Serve these bars with a glass of creamy almond milk to neutralize the sweetness while adding a subtle nuttiness that complements the almond butter beautifully.
-
Gourmet Sea Salt Caramel Sauce: Drizzle a bit of sea salt caramel sauce over the bars for an indulgent twist that intensifies the caramel flavor—truly a treat for caramel lovers!
-
Chocolate Mint Tea: This fragrant herbal tea enhances the cocoa flavor while introducing a refreshing minty note, making it an ideal companion for your Healthy Twix Bars.
-
Dark Chocolate-Covered Almonds: For an extra crunch, serve with a few dark chocolate-covered almonds. Their rich flavor will resonate well with the chocolate layers of the bars.
-
Pistachio Ice Cream: The slight saltiness and nuttiness of pistachio ice cream pair wonderfully with the sweetness of the bars, adding a lovely creamy touch.
How to Store and Freeze Healthy Twix Bars
Fridge: Store your Healthy Twix Bars in an airtight container in the refrigerator for up to 1 week. This keeps them fresh and ready for a quick indulgence whenever you need it.
Freezer: For longer storage, freeze the bars wrapped individually in plastic wrap and then in a freezer-safe container. They will keep well for up to 3 months; when you’re ready to enjoy, thaw in the fridge overnight.
Room Temperature: It’s best to avoid leaving them at room temperature for extended periods, as the chocolate may soften. If you must, limit to 1-2 hours for optimal texture and taste.
Reheating: If you prefer a warmer treat, pop them in the microwave for about 10-15 seconds; this brings out the gooey caramel layer without compromising the chocolate coating.
Expert Tips for Healthy Twix Bars
-
Cooling is Key: Ensure all layers cool completely before assembly. This helps prevent the caramel from melting into the shortbread, keeping your Healthy Twix Bars intact.
-
Slice with Precision: Use a sharp knife to cut through the bars smoothly. For a cleaner cut, consider warming the knife slightly before slicing.
-
Avoid Over-Freezing: If the chocolate hardens too much in the freezer, it may crack when slicing. Aim for a 30-minute freeze before cutting for the best results.
-
Layer Up Carefully: Pour the caramel over the shortbread gently, smoothing it out evenly. This helps achieve that perfect layer look and keeps each bite delightful.
-
Experiment Freely: Don’t hesitate to substitute almond butter with peanut butter or sunflower seed butter. This is a fun way to customize your Healthy Twix Bars to suit your tastes!
Make Ahead Options
These Healthy Twix Bars are perfect for busy home cooks who want to indulge without the last-minute hassle! You can prepare the shortbread layer and store it in an airtight container for up to 3 days in the refrigerator. Additionally, the caramel layer can be made ahead and kept chilled for up to 24 hours to maintain its creamy texture. When you’re ready to enjoy your bars, simply assemble by pouring the caramel over the shortbread and freeze for 1-2 hours until solid. Lastly, add the chocolate coating and chill for just 5-10 minutes before slicing. This way, you can enjoy these delectable treats with minimal effort, just as flavorful and delightful as if made fresh!
Healthy Twix Bars Recipe FAQs
What are the best ingredients to use for Healthy Twix Bars?
Absolutely! For the best flavors and textures, use high-quality ingredients. Opt for almond butter and dairy-free dark chocolate to enhance the taste without compromising on health. Coconut oil is also a great choice, as it adds richness and helps with binding. If you have nut allergies, sunflower seed butter works just as well!
How should I store my Healthy Twix Bars?
Store your Healthy Twix Bars in an airtight container in the refrigerator for up to 1 week. This keeps them fresh and satisfying whenever a sweet craving strikes! If you want to enjoy them later, freeze them for up to 3 months—just wrap each bar in plastic wrap and place them in a freezer-safe container.
Can I freeze Healthy Twix Bars?
Certainly! To freeze your Healthy Twix Bars, start by wrapping each bar individually in plastic wrap. Then, place them in a freezer-safe container. When you’re ready to enjoy, simply thaw them in the refrigerator overnight for a delicious treat that tastes like freshly made!
What should I do if the chocolate on my Healthy Twix Bars cracks when slicing?
Don’t worry! This can happen if the chocolate hardens too much in the freezer. Aim for a freeze time of about 30 minutes before slicing to keep it firm yet manageable. If you do find it too hard, let it sit at room temperature for a few minutes before trying to cut through—patience is key!
Are Healthy Twix Bars suitable for people with dietary restrictions?
Very! These bars are gluten-free, dairy-free, and refined sugar-free, making them an excellent choice for those with such dietary needs. If you have nut allergies, substitute almond butter for sunflower seed butter and use nut-free chocolate chips to make it completely allergen-friendly.

Irresistibly Healthy Twix Bars You Can’t Resist Indulging!
Ingredients
Equipment
Method
- Preheat your oven to 350°F (175°C) and prepare your baking dish with parchment paper.

- Combine coconut flour, almond flour, melted coconut oil, and warmed honey in a mixing bowl. Mix until a slightly sticky dough forms and transfer to the baking dish, pressing evenly. Bake for 10-12 minutes until golden brown, then cool completely.
- In a saucepan over medium-low heat, whisk together almond butter, coconut oil, vanilla extract, maple syrup, and sea salt until smooth, about 5-7 minutes. Let cool before pouring over the shortbread layer.
- Melt dark chocolate and coconut oil in a microwave-safe bowl, stirring until glossy. About 1-2 minutes total in the microwave.
- Once the caramel has cooled, pour it over the shortbread, then place in the freezer for 1-2 hours until solidified.
- After caramel sets, drizzle melted chocolate on top and sprinkle flakey sea salt. Chill for additional 5-10 minutes, then slice and enjoy!
Leave a Reply