
As I surveyed the overflowing bins of colorful candies and vibrant blooms at the market, I couldn’t help but be swept up in the cheerful spirit of spring. This Easter, I’m thrilled to share my Easter JELLO Cheesecake, a delightful no-bake dessert that brings a splash of pastel joy to any gathering. With fluffy layers of creamy cheesecake nestled between colorful Jell-O, this layered masterpiece not only looks stunning but also comes together in a breeze—making it the perfect treat for those busy holiday preparations. Plus, the customizable flavors let you tailor it to your family’s favorites. Ready to leave your guests in awe? Let’s create something truly special together!
Why is JELLO Cheesecake a Must-Try?
Simplicity: No baking required! This Easter JELLO Cheesecake is incredibly easy to whip up, allowing you to focus on celebrating rather than fussing in the kitchen.
Customization: Tailor each layer’s flavor and color to suit your taste; whether fruity, zesty, or classic — the options are endless!
Crowd-Pleaser: Its vibrant presentation is sure to impress guests and bring a festive spirit to any table at holiday gatherings or potlucks.
Make-Ahead Friendly: You can prepare it a day in advance, making holiday prep a breeze. Just chill, slice, and serve!
Light and Airy Texture: The fluffy layers and rich creamy center create a delightful contrast that feels indulgent yet refreshing.
Get ready to savor this seasonal treat, and don’t forget to explore delicious serving suggestions to complement your Easter JELLO Cheesecake!
Easter JELLO Cheesecake Ingredients
For the Cheesecake Base
• Jell-O Classic No-Bake Cheesecake Mix – This acts as the foundation for a creamy and delightful cheesecake. You may substitute it with another no-bake cheesecake mix if you prefer.
• Ingredients Required Per Box (milk, butter, etc.) – These provide the necessary moisture and texture for the cheesecake, ensuring it sets perfectly. Make sure to adjust as per the brand you choose.
• Cooking Spray – This helps prevent the cheesecake from sticking to the springform pan; you can also use parchment paper for easy release.
For the Jell-O Layers
• Blue Jell-O Powder (3 tablespoons) – Adds a sweet flavor and vibrant color for the first layer; feel free to replace it with your favorite flavor.
• Strawberry or Cherry Jell-O Powder (3 tablespoons) – Offers a fruity taste and a lively hue for the second layer. Other flavors can also be substituted for variety.
• Boiling Water (⅓ cup for blue Jell-O, ½ cup for red Jell-O) – Essential for dissolving Jell-O powder; ensure the water is boiling hot for the best results.
• Ice Cold Water (½ cup for each Jell-O layer) – This cools down the Jell-O mixture before combining it with the Cool Whip, helping it set nicely.
For the Creamy Layers
• Cool Whip (3 tubs, 8 oz each) – This is the secret to achieving that fluffy, creamy texture in the cheesecake. You can also use homemade whipped cream for an even fresher taste.
For Optional Toppings
• Cadbury Pastel Mini Eggs (optional) – These add a fun and festive touch to your beautiful cheesecake; feel free to swap with other seasonal candies or leave them off for simplicity.
With these ingredients ready to go, you’ll be well on your way to creating a stunning Easter JELLO Cheesecake that brings joy to your holiday celebrations!
Step‑by‑Step Instructions for Easter JELLO Cheesecake
Step 1: Prepare the Springform Pan
Begin by spraying a 9-inch springform pan with cooking spray to prevent sticking. Next, prepare the graham cracker crust as per your Jell-O Classic No-Bake Cheesecake Mix instructions, pressing it evenly into the bottom of the pan. Allow it to set while you prepare the filling, creating a solid base for your Easter JELLO Cheesecake.
Step 2: Make the Cheesecake Filling
In a mixing bowl, combine the Jell-O Classic No-Bake Cheesecake Mix with the required ingredients, such as milk and butter. Beat the mixture until it’s smooth and creamy, then pour it over the graham cracker crust in the springform pan. Refrigerate the cheesecake for about 30 minutes until it is slightly set, forming the first layer.
Step 3: Prepare the Blue Jell-O Layer
To create the blue layer, dissolve 3 tablespoons of blue Jell-O powder in ⅓ cup of boiling water, stirring until completely smooth. Once dissolved, mix in ½ cup of ice cold water and let it cool. After cooling, gently fold in one tub of Cool Whip until well combined. Allow this mixture to chill for an additional 30 minutes before spreading over the cheesecake layer.
Step 4: Add the Strawberry or Cherry Layer
For the next layer, dissolve 3 tablespoons of strawberry or cherry Jell-O powder in ½ cup of boiling water, stirring until smooth. Add ½ cup of ice cold water and allow it to cool. Once the mixture is chilled, fold in another tub of Cool Whip and spread it evenly over the blue layer, creating a beautiful contrast in your Easter JELLO Cheesecake.
Step 5: Chill and Set the Cheesecake
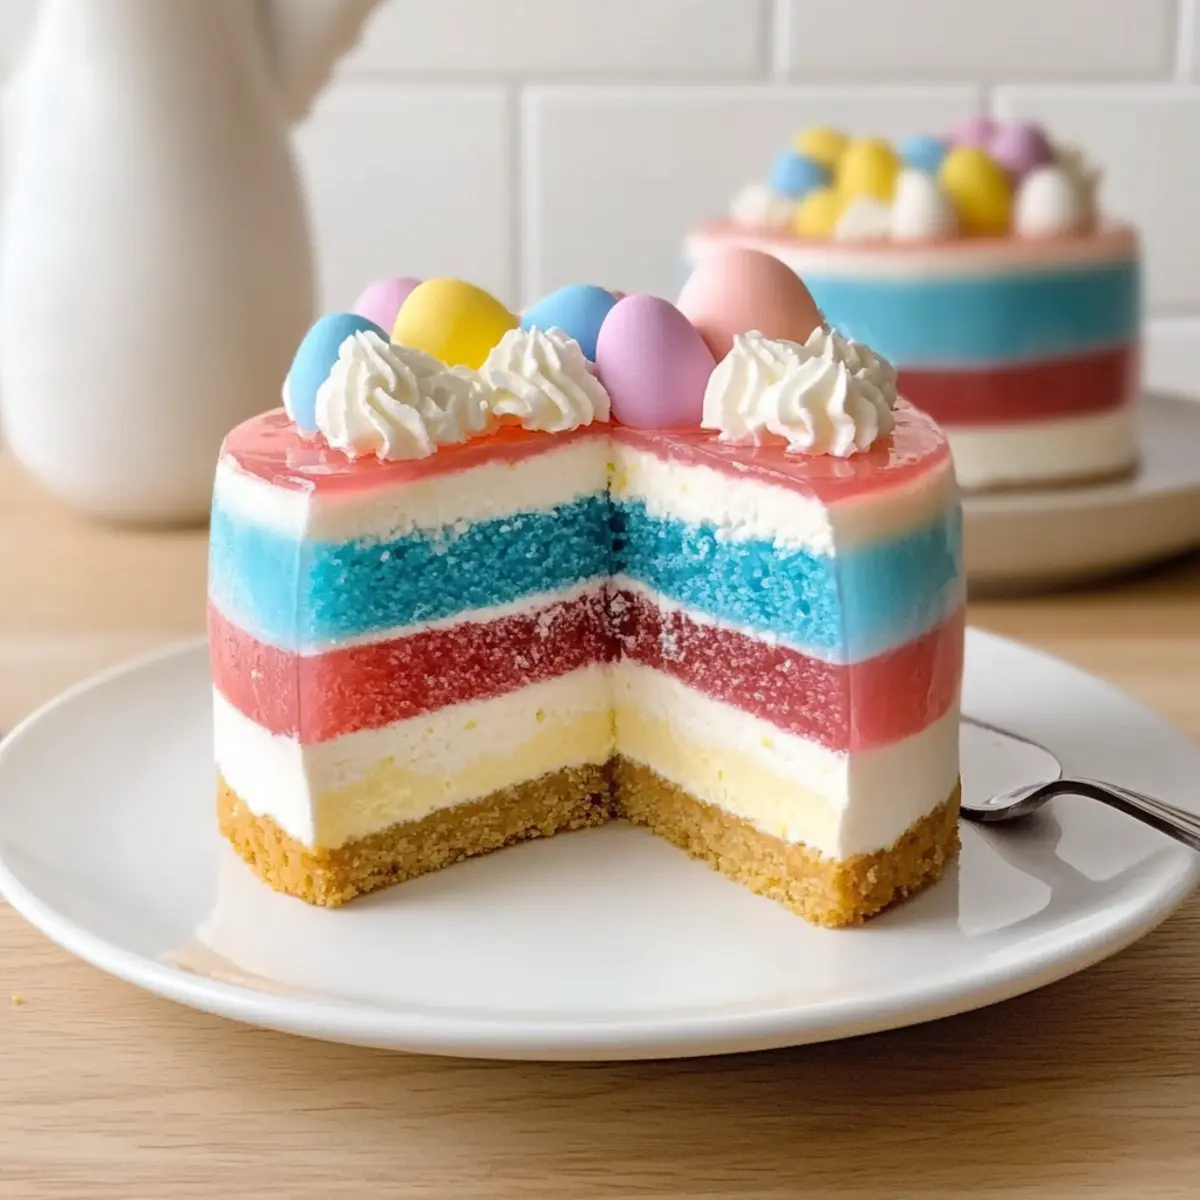
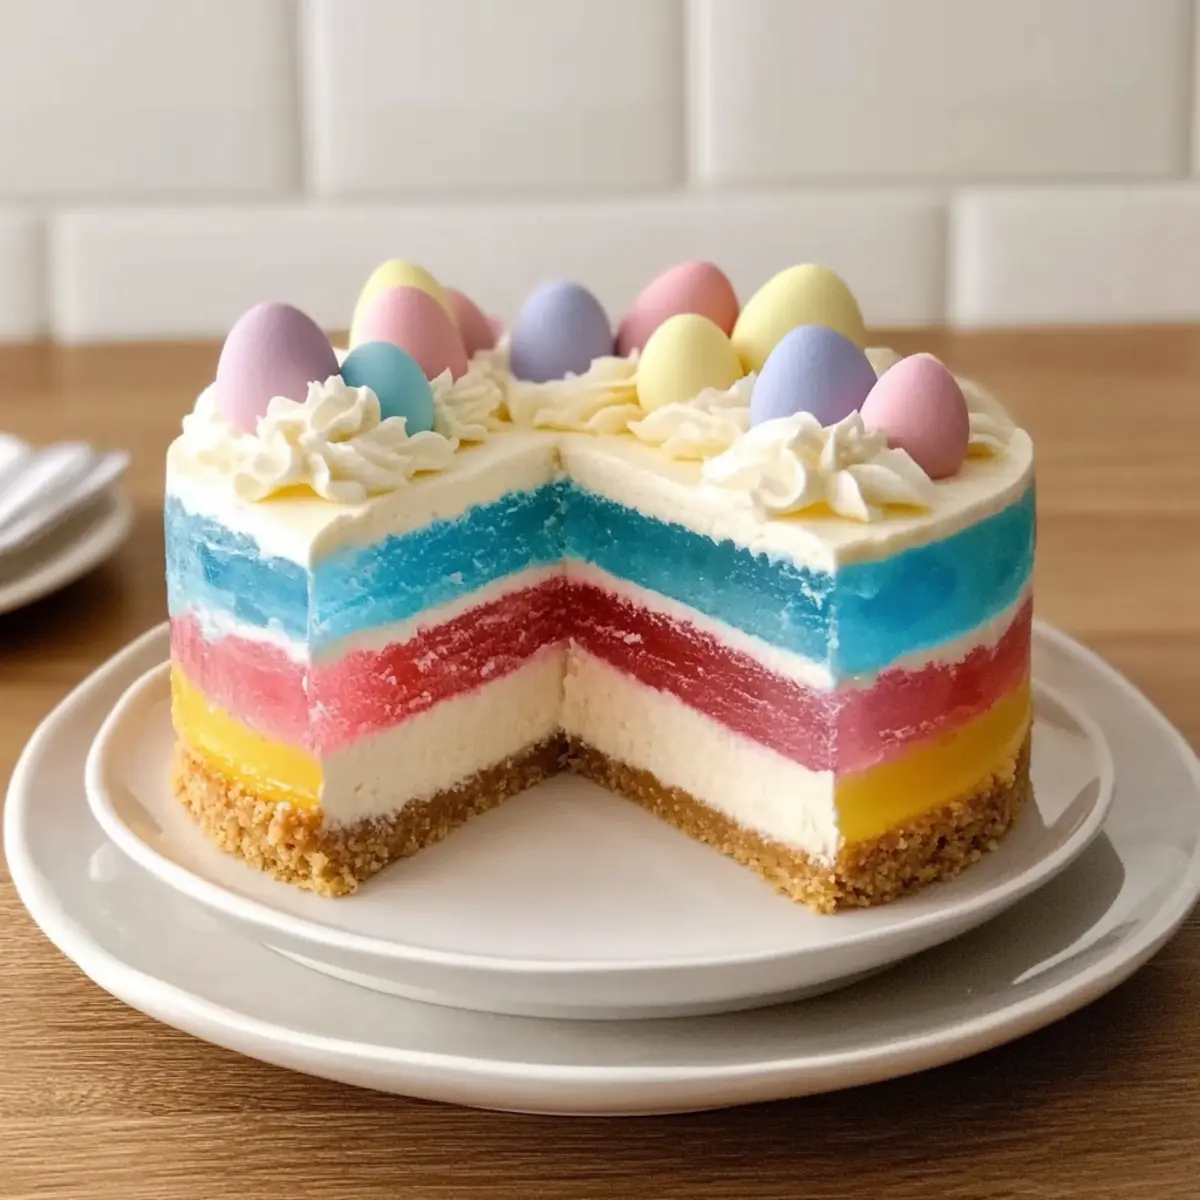
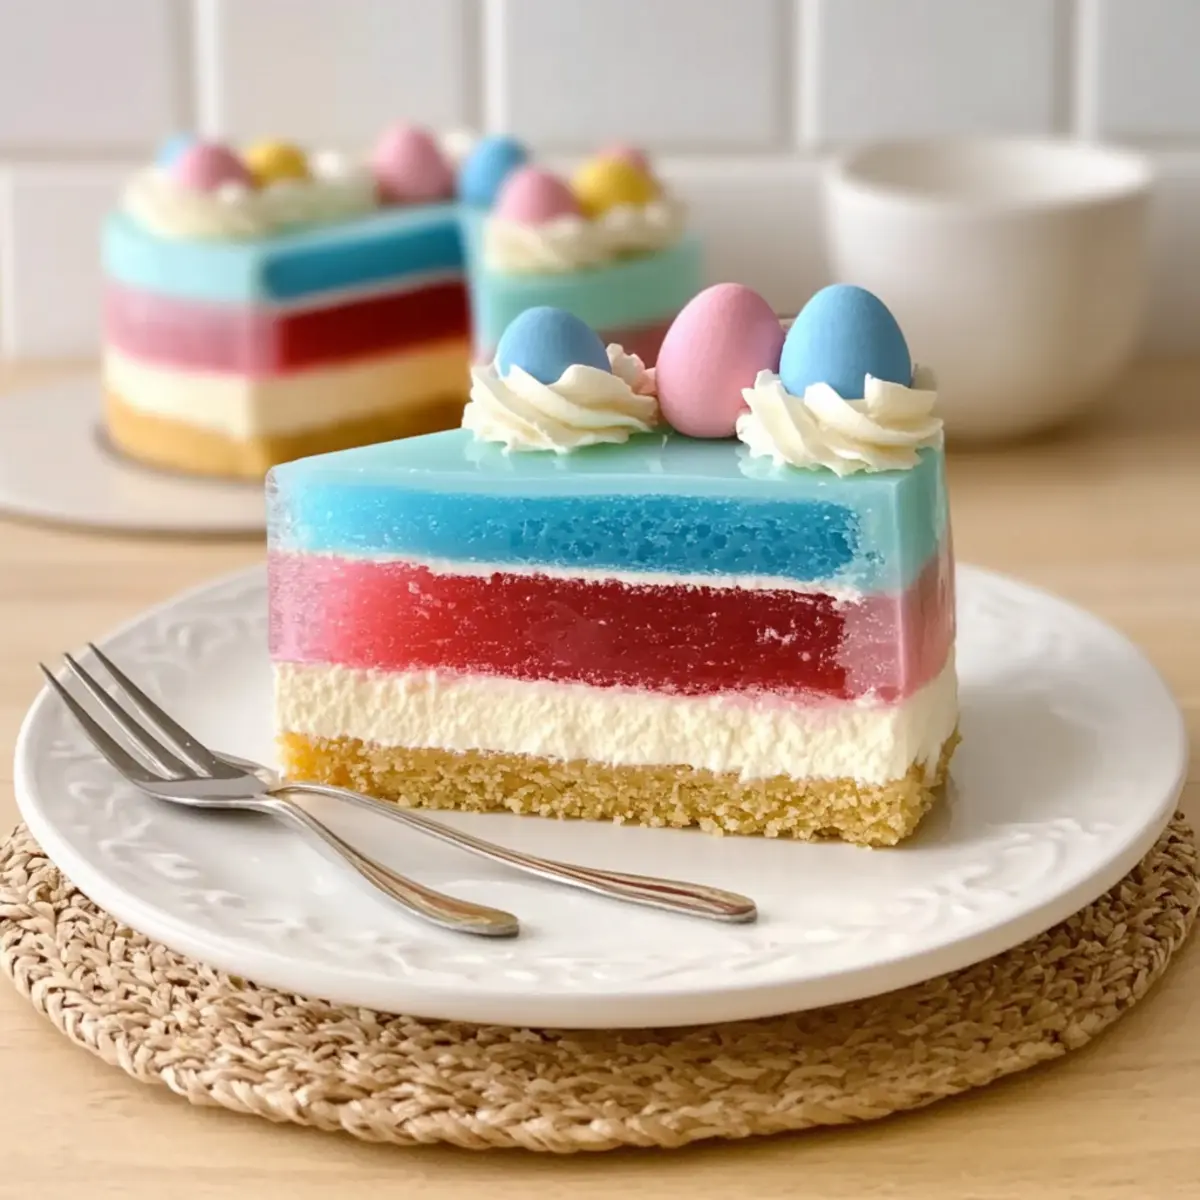
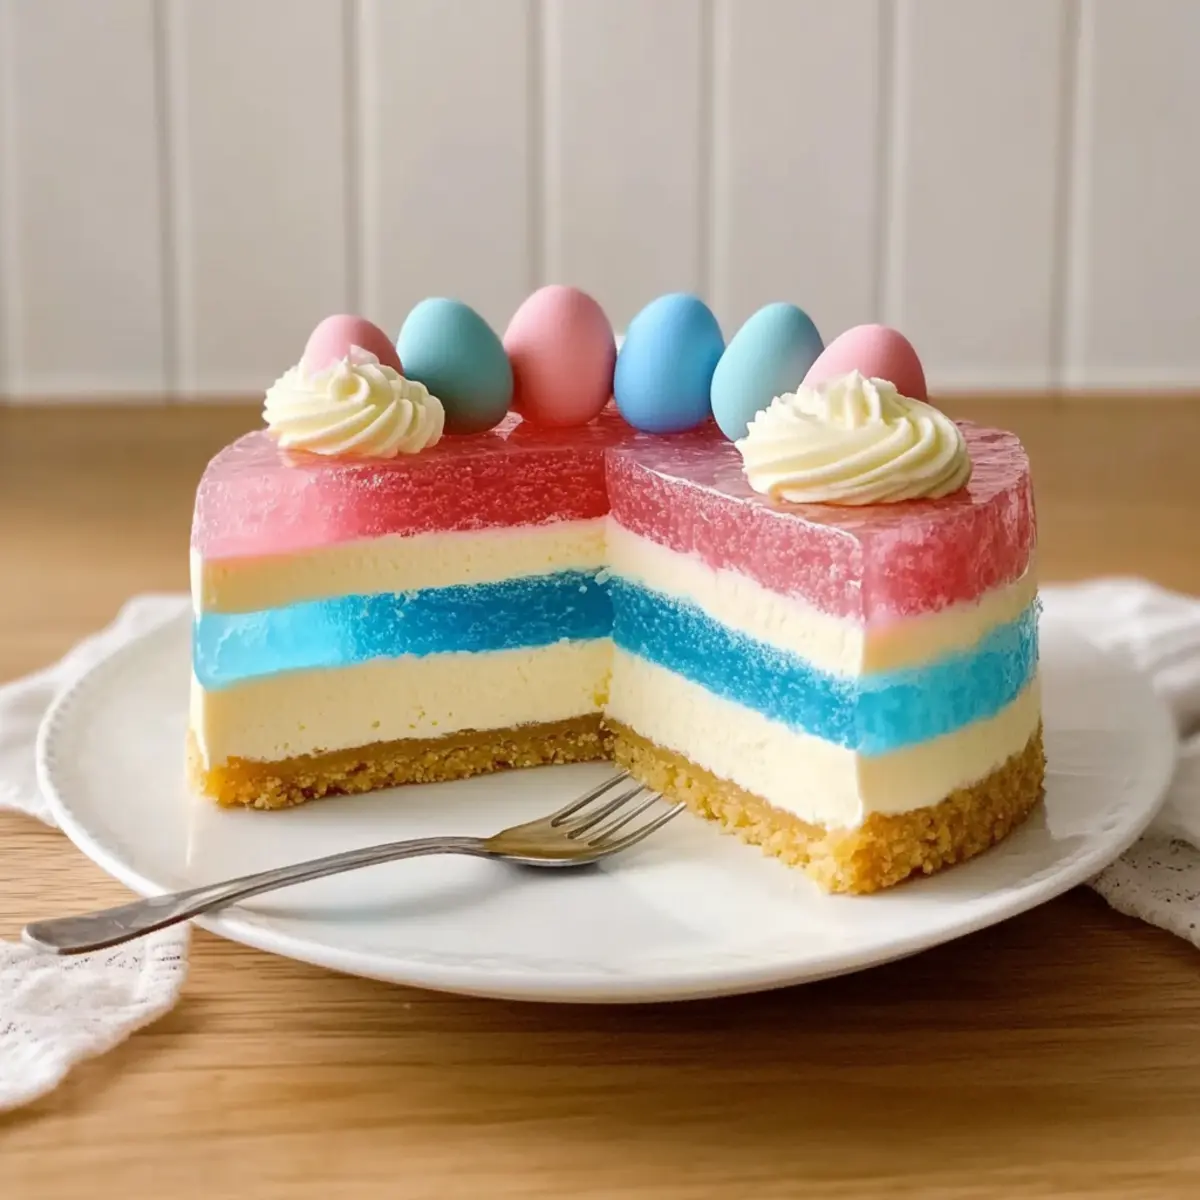
Cover the assembled cheesecake with plastic wrap, ensuring it’s airtight, and refrigerate for at least 4 hours or preferably overnight. This allows the layers to fully set and meld together, resulting in a delightful texture and flavor combination. You’ll know it’s ready when the layers are firm and the colors are vibrant.
Step 6: Final Touches
Once chilled, carefully remove the cheesecake from the springform pan and place it on a serving platter. Use the last tub of Cool Whip to spread or pipe a fluffy layer on top of the cheesecake. For a festive touch, decorate with optional Cadbury pastel mini eggs, adding color and whimsy, perfect for your Easter celebration.
Step 7: Serve and Enjoy
Cut the Easter JELLO Cheesecake into slices, serving chilled to highlight its refreshing flavors. This colorful dessert is a true showstopper at any spring gathering, so gather your friends and family around the table to enjoy each delightful layer together.
Make Ahead Options
These Easter JELLO Cheesecake layers are perfect for busy home cooks looking to simplify their holiday preparations! You can prepare the cheesecake base and first Jell-O layer up to 24 hours in advance, allowing for a stress-free assembly when it’s time to finish. Simply store the cheesecake tightly covered in the refrigerator to maintain its creamy texture. When you’re ready to complete the dessert, prepare the second Jell-O layer and let it chill until set, which takes approximately 4 hours. Make sure to add the final Cool Whip topping just before serving for that fluffy finish. By meal prepping in advance, you’ll have more time to enjoy your spring celebrations with family and friends!
Expert Tips for Easter JELLO Cheesecake
-
Chill Between Layers: Always ensure each layer is fully chilled before adding the next. This maintains distinct layers and an eye-catching presentation.
-
Cool Liquid Caution: Avoid warm liquids when mixing with Cool Whip, as they can melt it. Cool the Jell-O mixtures properly to retain that fluffy texture.
-
Neat Slicing: For clean cuts, rinse a knife in hot water before each slice and wipe it dry. This helps maintain the beautiful layers of your Easter JELLO Cheesecake.
-
Flavor Experimentation: Don’t hesitate to mix and match Jell-O flavors—grape, lemon, or lime can add zest and variety to your dessert. Have fun customizing!
-
Storage Tip: If you’re making this dessert ahead of time, cover it well to keep all the flavors fresh while showcasing the colorful layers. Enjoy it for up to three days!
What to Serve with Easter JELLO Cheesecake
Elevate your festive gatherings by pairing this delightful dessert with complementary sides that balance flavors and textures.
-
Fresh Berries: Juicy strawberries or raspberries add a succulent burst of flavor that pairs beautifully with the creamy cheesecake.
-
Minty Fruit Salad: A refreshing mix of seasonal fruits tossed with mint offers a light and zesty contrast to the richness of the cheesecake.
-
Chocolate Drizzle: A simple warm chocolate sauce enhances the sweetness of the layers, creating a deliciously indulgent experience with every bite.
-
Mini Pastries: Flaky pastry bites filled with fruit or cream make for a fun, interactive dessert table that guests will love exploring.
-
Sparkling Lemonade: A fizzy lemon drink brings a refreshing effervescence that cuts through the cheesecake’s creaminess, making each bite feel light.
-
Pistachio Topping: Chopped pistachios add a crunchy texture and nutty flavor that beautifully contrasts with the smooth layers of the dessert.
-
Colorful Gelatin Cups: Serve small cups of flavored gelatins for a playful touch that echoes the vibrant layers of the cheesecake while offering a different texture.
-
Herbal Iced Tea: A refreshing herbal iced tea will cleanse the palate and enhance the whole dessert experience with its subtle flavors.
Pair these delightful options with your Easter JELLO Cheesecake to create an unforgettable spring celebration!
How to Store and Freeze Easter JELLO Cheesecake
Fridge: Store the Easter JELLO Cheesecake in an airtight container or cover it tightly with plastic wrap. It will stay fresh for up to 3 days, maintaining its colorful layers.
Freezer: For longer storage, you can freeze the cheesecake. Wrap it well in plastic wrap followed by aluminum foil to prevent freezer burn. It can be frozen for up to 2 months.
Thawing: When ready to enjoy, transfer the cheesecake to the fridge and let it thaw overnight. This will help preserve the texture of the delicious layers.
Reheating: As this cheesecake is served chilled, there is no reheating necessary. Simply slice and serve straight from the refrigerator for a refreshing treat!
Easter JELLO Cheesecake Variations & Substitutions
Feel free to sprinkle your own creativity into this delicious recipe with delightful twists!
- Lemon Zest: Swap blue Jell-O with lemon for a bright and refreshing flavor that dances on your palate.
- Fruit Flavors: Use grape or lime Jell-O for vibrant layers that create a fun rainbow effect in your cheesecake!
- Whipped Cream Alternative: Substitute Cool Whip with homemade whipped cream for a fresher, richer taste that adds a personal touch.
- Decadent Chocolate Drizzle: Add a drizzle of chocolate sauce over the top before serving for a sweet contrast that will leave everyone wanting more.
- Nutty Crunch: Mix crushed nuts into the graham cracker crust for an added crunchy texture that complements the smooth layers beautifully.
- Coconut Delight: Top with shredded coconut for a tropical twist that adds a lovely texture and flavor alongside the fruity Jell-O.
- Garnish Ideas: Consider adding fresh berries or edible flowers on top for an elegant presentation that’s perfect for spring celebrations.
- Spicy Kick: Add a pinch of cinnamon or nutmeg to the graham cracker crust for a surprising hint of warmth in contrast to the cool cheesecake.
With these variations, the possibilities are endless! Let your imagination flourish as you create the perfect Easter JELLO Cheesecake for your gathering. And if you’re feeling adventurous, why not try experimenting with some classic family-loved recipes to broaden your dessert repertoire?
Easter JELLO Cheesecake Recipe FAQs
What kind of Jell-O should I use for the layers?
Absolutely! You can use any flavor of Jell-O that excites your taste buds. Popular choices include blue raspberry for the first layer and strawberry or cherry for the second. Feel free to mix it up with flavors like lemon or lime for a delightful twist—after all, the more the merrier!
How do I store leftover Easter JELLO Cheesecake?
To keep your cheesecake fresh, store it in an airtight container or cover it tightly with plastic wrap. It will stay delicious in the refrigerator for up to 3 days. Just be sure to shield those lovely layers from any strong odors in your fridge!
Can I freeze the Easter JELLO Cheesecake?
Yes, you can freeze it! Wrap the cheesecake tightly in plastic wrap, then in aluminum foil to avoid freezer burn. It can be stored in the freezer for up to 2 months. When you’re ready to enjoy a slice, thaw it in the fridge overnight for the best texture.
How can I achieve clean slices when serving?
For the neatest slices, rinse a sharp knife in hot water before each cut, then dry it off. This helps maintain the integrity of the vibrant layers and ensures every piece looks as stunning as it tastes!
Is this dessert safe for pets or people with allergies?
While the Easter JELLO Cheesecake is a delightful treat for humans, it’s best to keep it away from pets, as ingredients like chocolate from the optional Cadbury eggs can be harmful to them. If you have guests with allergies, be sure to check the ingredients for any potential allergens like dairy or gluten. Adjust accordingly with suitable substitutes for a safe and enjoyable dessert!
Easter JELLO Cheesecake
Ingredients
Equipment
Method
- Prepare the Springform Pan by spraying it with cooking spray and pressing the graham cracker crust into the bottom
- Make the Cheesecake Filling by combining the Jell-O Classic No-Bake Cheesecake Mix with the required ingredients and refrigerate for about 30 minutes
- Prepare the Blue Jell-O Layer by dissolving the blue Jell-O powder in boiling water, mixing with ice cold water, and folding in one tub of Cool Whip
- Add the Strawberry or Cherry Layer by dissolving the corresponding Jell-O powder in boiling water, mixing with ice cold water, and folding in another tub of Cool Whip
- Chill and Set the Cheesecake for at least 4 hours or overnight, ensuring the layers are firm
- Final Touches by spreading the last tub of Cool Whip on top and decorating with optional Cadbury pastel mini eggs
- Serve and Enjoy by slicing the cheesecake and serving chilled
Leave a Reply