
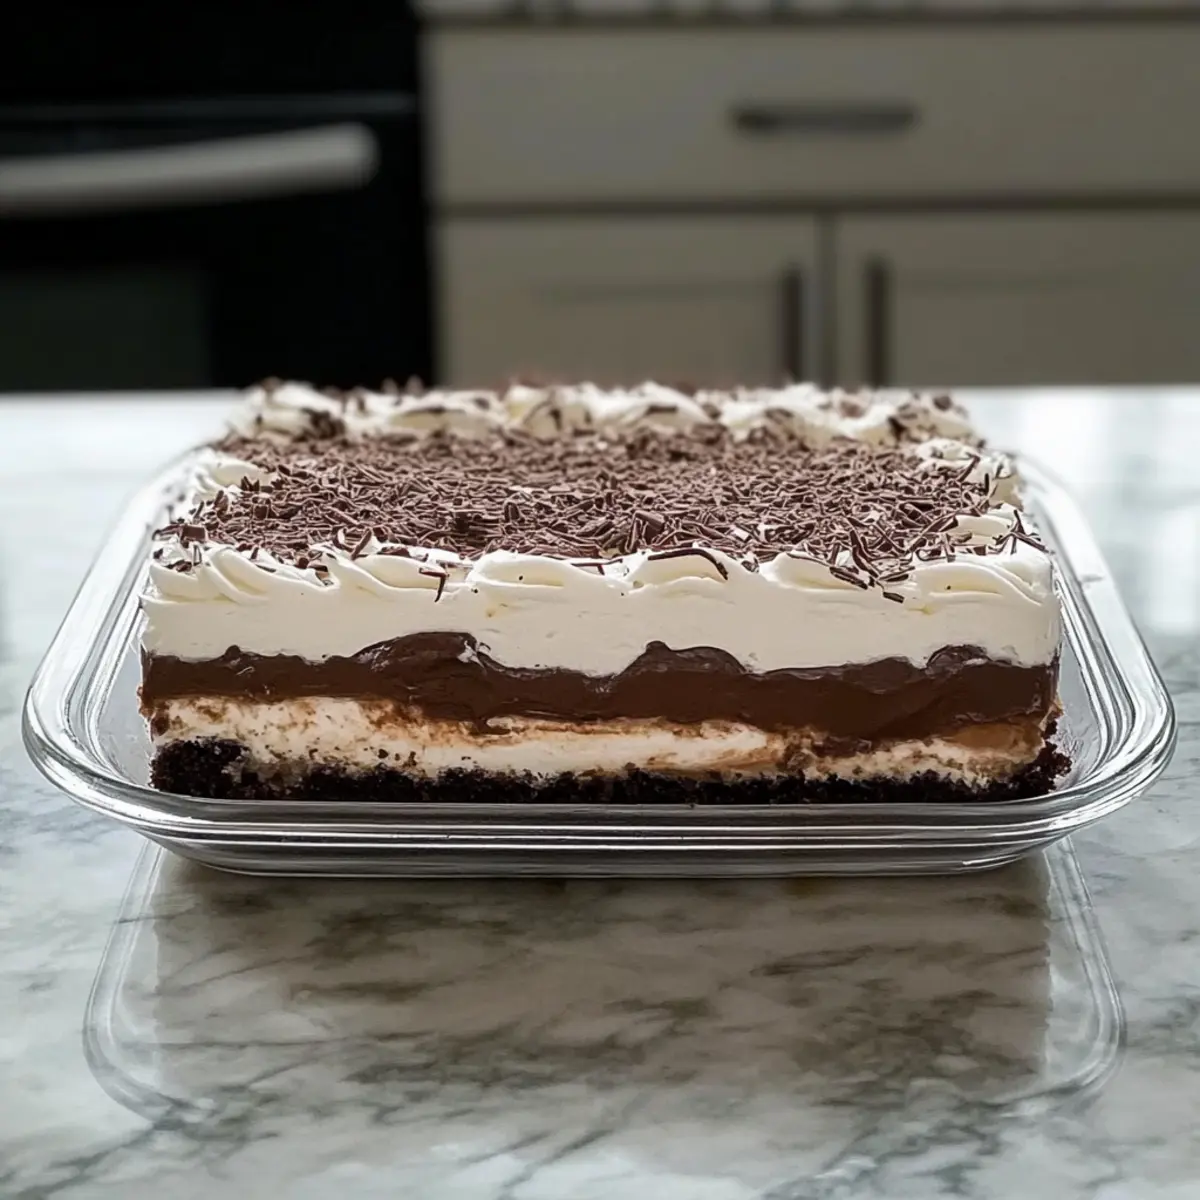
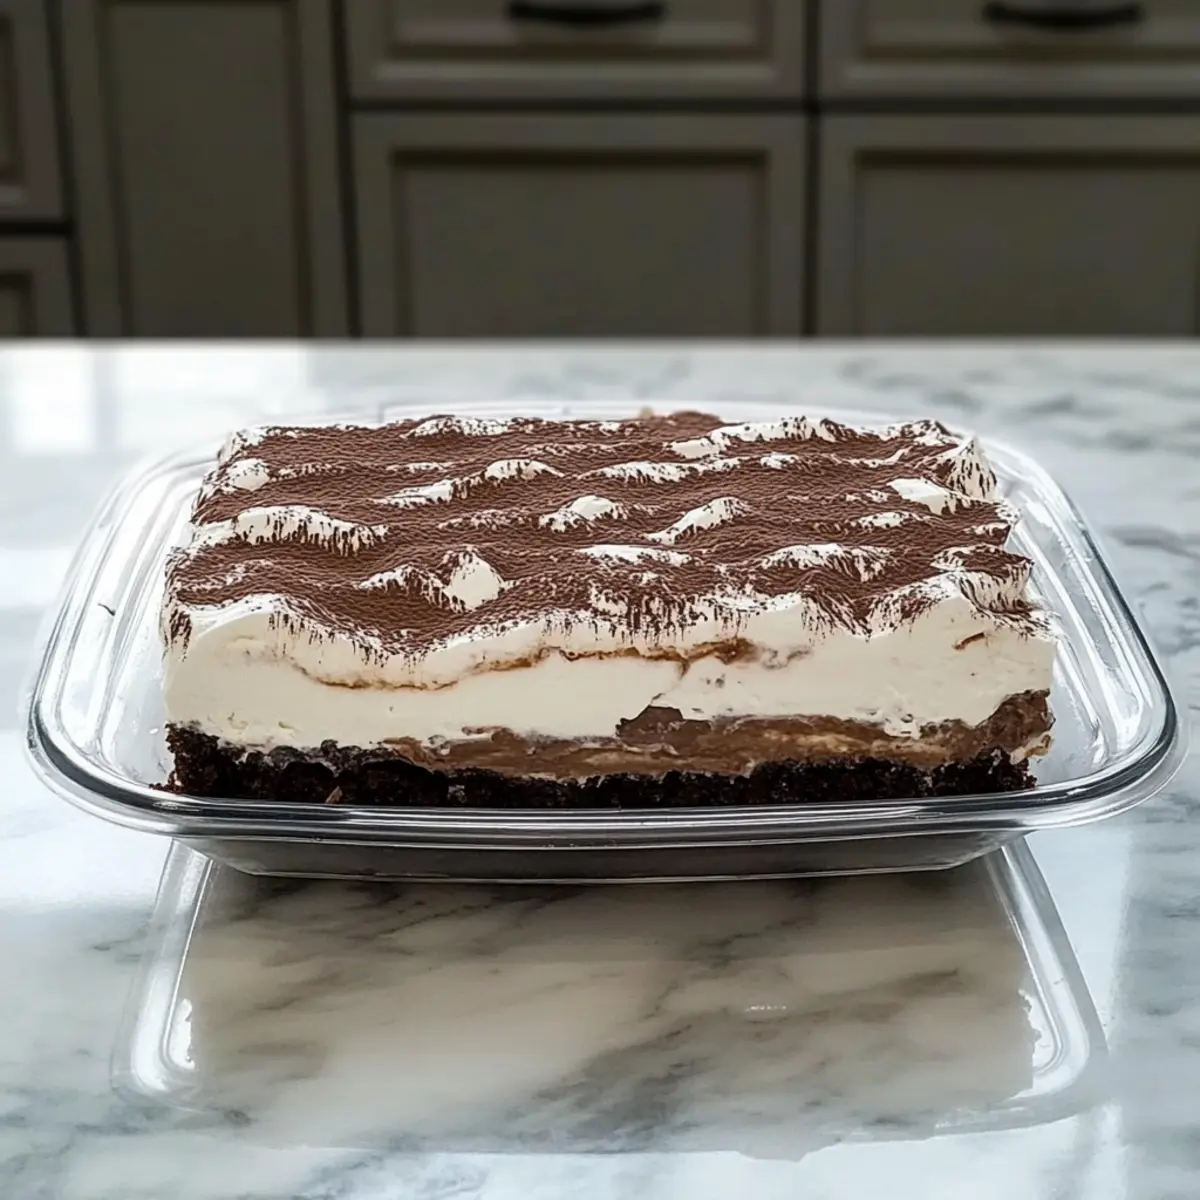
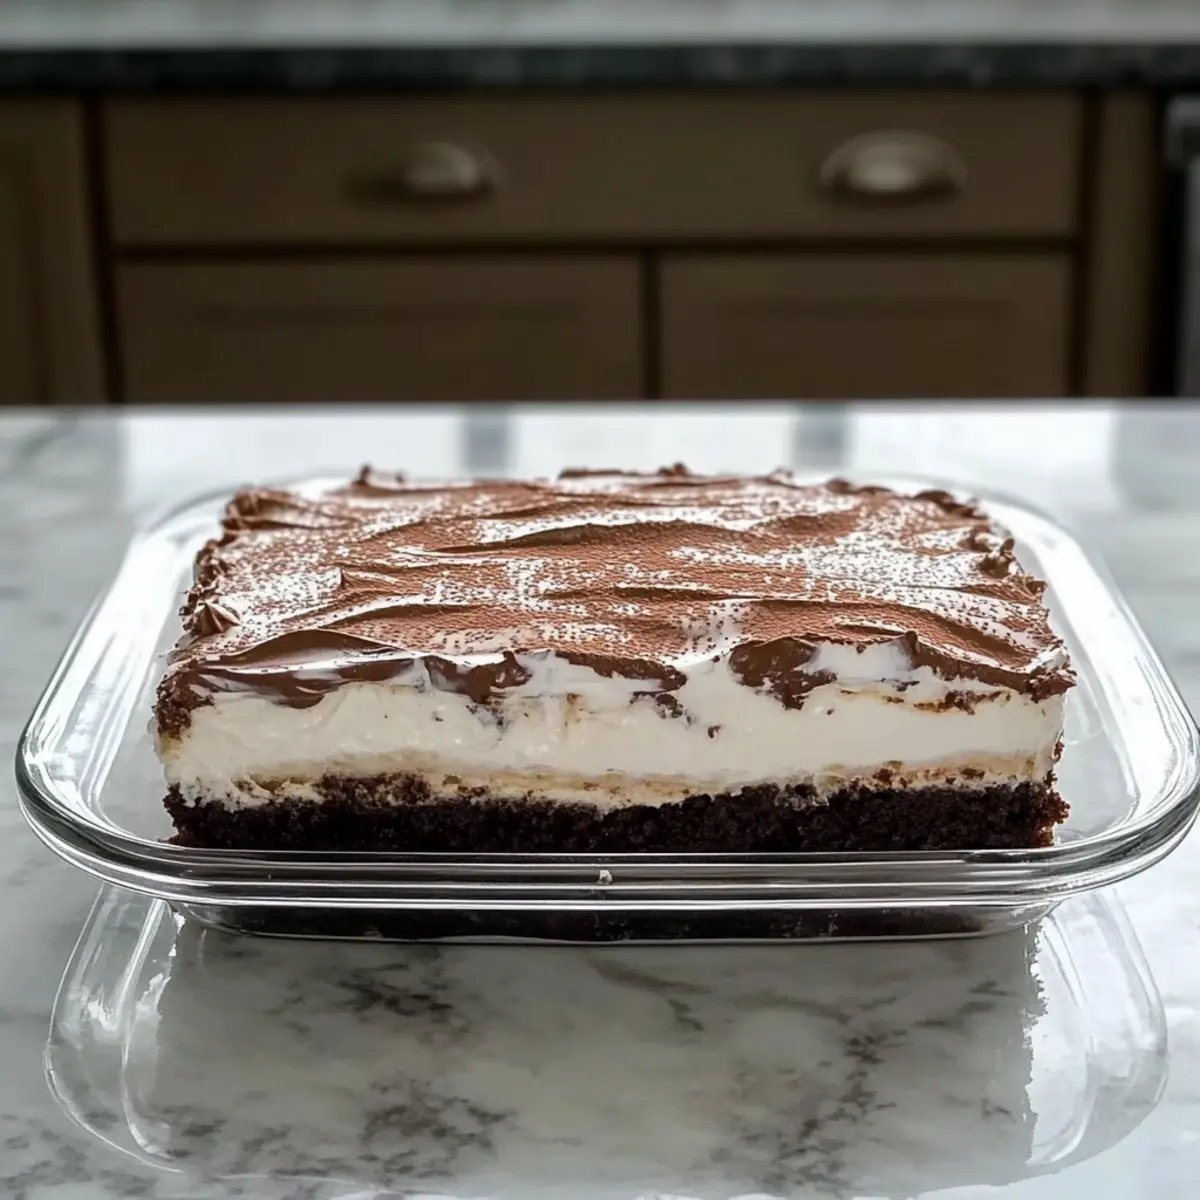
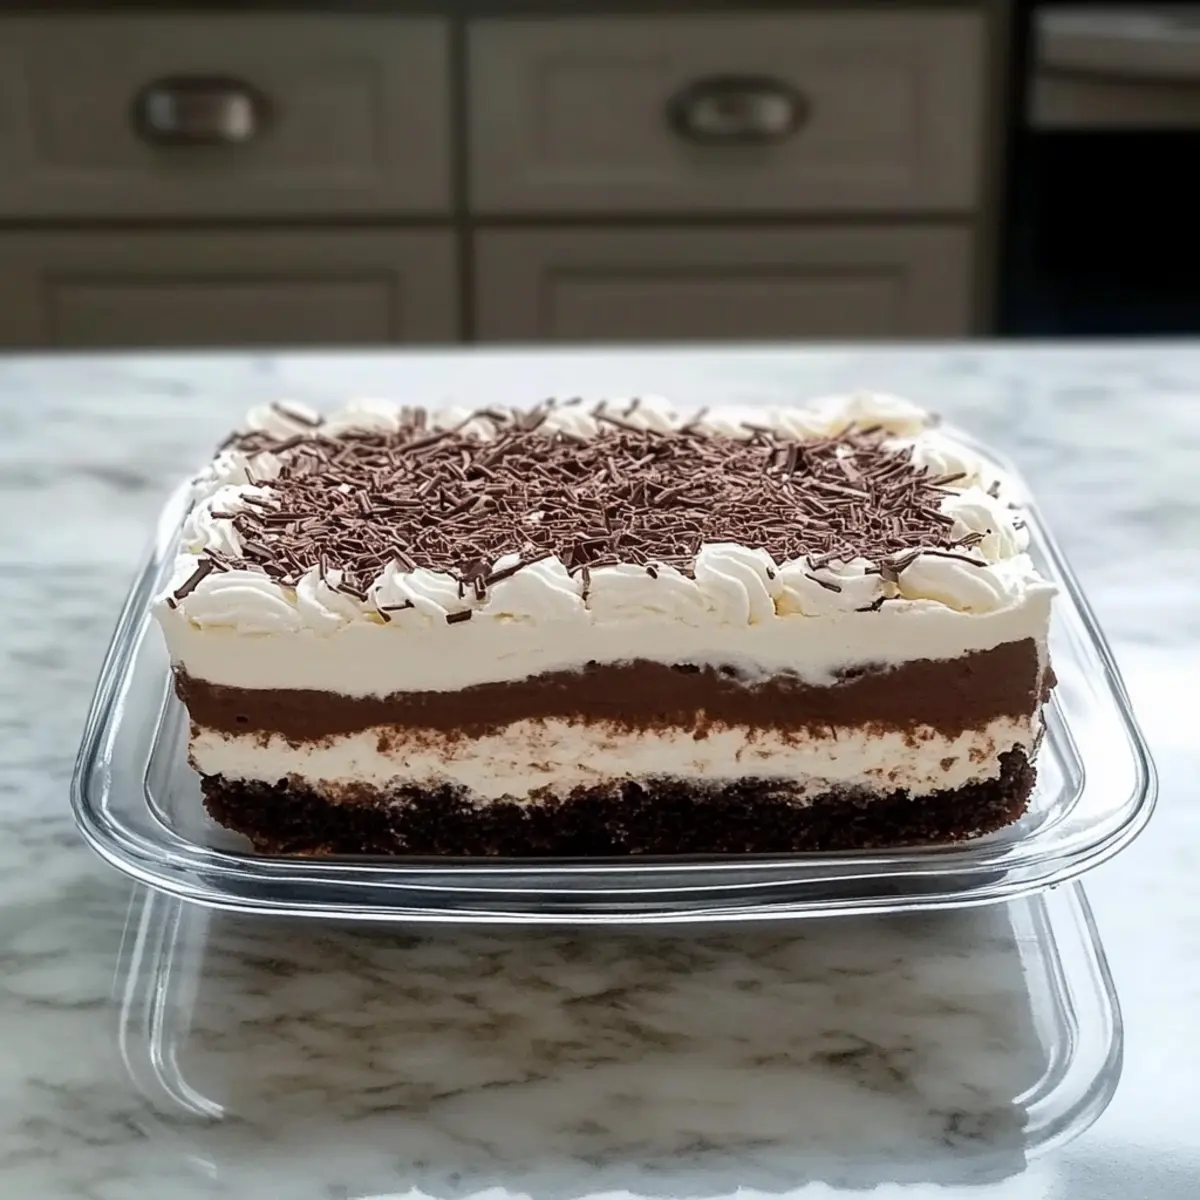
The sound of laughter and clinking glasses filled the room as I set down my plate, almost trembling with excitement. I wasn’t just bringing dessert; I was unveiling my Easy Brownie Refrigerator Cake, a showstopper that never fails to steal the spotlight at potlucks. This creamy brownie cake layers a chewy brownie base with rich cream cheese, silky chocolate pudding, and a dreamy whipped topping, making it a guaranteed crowd-pleaser. The real beauty? It’s make-ahead, which means less stress for you and more time to enjoy the company of friends and family. Just imagine taking that first bite—every layer working in harmony, creating a delicious experience that begs to be savored. Ready to impress your guests and elevate your dessert game? Let’s dive into the details!
Why is this Creamy Brownie Cake perfect?
Effortless Preparation: This recipe is a breeze to assemble, allowing you to whip up a stunning dessert without fuss.
Layered Delight: Enjoy a harmonious blend of flavors and textures— chewy brownie, creamy cheese, silky pudding, and fluffy topping.
Make-Ahead Convenience: Perfect for busy schedules, you can prepare this dessert 1-2 days in advance, making it the ultimate potluck treat.
Crowd-Pleasing Appeal: Impress your family and friends with a dessert that’s sure to be the talk of the table, offering rich flavor in every bite.
Versatile Customizations: Feel free to add your personal touch with variations like crushed Oreos or peanut butter swirls, ensuring you make it your own.
This creamy brownie cake isn’t just delicious; it’s a sweet memory waiting to happen!
Creamy Brownie Cake Ingredients
• Dive into this delightful Creamy Brownie Cake creation with these key ingredients for an unforgettable dessert!
For the Brownie Base
- Brownie Mix – Provides the chewy foundation; consider a homemade brownie recipe for an extra special touch.
- Extra-Large Egg – Adds moisture and structure, ensuring a perfect texture to your brownies.
For the Cream Cheese Layer
- Cream Cheese (8 ounces, softened) – This tangy layer adds richness; opt for light cream cheese for a lighter alternative, but be cautious of stability.
- Powdered Sugar (1 cup) – Sweetens and helps stabilize the cream cheese layer for a smooth finish.
For the Pudding Layer
- Instant Chocolate Pudding Mix (1 package, 3 ounces) – This rich addition brings deep chocolate flavor; a must for any brownie lover!
- Instant Vanilla Pudding Mix (1 package, 3 ounces) – Balances the chocolate and complements flavors, enhancing the overall taste.
- Cold Milk (3.5 cups) – Essential for thickening the pudding; whole milk offers a luxurious texture, but lower-fat options work too.
For the Topping
- Cool Whip Frozen Whipped Topping (2 containers, 8 ounces each, thawed) – Provides a light, fluffy finish; homemade stabilized whipped cream is a worthy substitution if you prefer.
For Garnish
- Hershey Candy Bar or Chocolate Syrup – Adds an optional decorative touch and extra chocolate flavor; perfect for making your dessert Instagram-worthy!
Step‑by‑Step Instructions for Creamy Brownie Cake
Step 1: Prepare the Brownie Base
Preheat your oven to 350°F (175°C) and grease a 9×13-inch baking pan. In a mixing bowl, prepare the brownie mix according to the package instructions, incorporating the extra-large egg. Pour the batter into the prepared pan and spread it evenly. Bake for 25–30 minutes or until a toothpick inserted in the center comes out clean. Allow the brownies to cool completely in the pan on a wire rack.
Step 2: Make the Cream Cheese Layer
While the brownies are cooling, prepare the cream cheese layer. In a mixing bowl, beat the softened cream cheese and powdered sugar together until smooth and creamy. Once combined, gently fold in one container of thawed Cool Whip until fully incorporated. Spread this cream cheese mixture evenly over the cooled brownie base, smoothing it out to create a nice layer.
Step 3: Prepare the Pudding Layer
In another bowl, whisk together the instant chocolate pudding mix and instant vanilla pudding mix with 3.5 cups of cold milk. Whisk for about 2 minutes or until the mixture thickens to a pudding-like consistency. Carefully pour this rich chocolate pudding layer over the cream cheese layer, ensuring it spreads evenly to cover the entire surface.
Step 4: Finish with Whipped Topping
Now it’s time to add the finishing touch! Take the second container of thawed Cool Whip and gently spread it over the pudding layer, making sure to cover it completely. Use a spatula to create a smooth, even layer, which adds a delightful fluffiness to your creamy brownie cake.
Step 5: Garnish and Chill
For the final flourish, you can garnish your creamy brownie cake with chocolate shavings or a drizzle of chocolate syrup. Cover the dish with plastic wrap and refrigerate for at least 4 hours, or ideally overnight. Chilling will help the layers set beautifully, allowing for clean slices when you serve this crowd-pleasing dessert!
How to Store and Freeze Creamy Brownie Cake
Fridge: Cover tightly with plastic wrap or foil and store in the refrigerator for up to 4-5 days. The layers will continue to meld and enhance the flavor!
Freezer: For longer storage, freeze the entire cake or individual slices, wrapped securely in plastic wrap and then in aluminum foil. It can last up to 3 months!
Thawing: To enjoy, thaw in the refrigerator overnight. This gradual thaw helps maintain the creamy texture and flavor.
Reheating: Serve chilled for the best taste experience—no reheating needed for this delightful make-ahead treat!
What to Serve with Easy Brownie Refrigerator Cake
Indulging in this dessert masterpiece opens the door to a deliciously memorable meal experience.
- Fresh Berries: Bright and juicy, berries provide a refreshing contrast to the rich layers of the creamy brownie cake.
- Vanilla Bean Ice Cream: A scoop of this creamy delight takes the dessert to a new level; it’s the perfect accompaniment for a scoop and a slice.
- Chocolate Sauce Drizzle: Enhance the chocolate flavor by drizzling warm chocolate sauce on top, adding a silky richness that everyone will love.
- Caramel Sauce: A luscious caramel drizzle offers a sweet contrast that beautifully complements the chocolatey layers of the cake.
- Coffee: A warm cup of coffee brings together flavors while cutting through the richness of the dessert, enhancing the whole experience.
- Mint Leaves Garnish: A sprinkle of fresh mint not only adds color but also brings a hint of freshness that balances the cake’s richness.
- Spiced Nuts: Roasted spiced nuts add a crunchy texture and warmth, creating a delightful juxtaposition with the creamy brownie layers.
- Creamy Cheesecake Swirls: For an ambitious pairing, serve slices of cheesecake as a side, introducing another creamy element that chocolate lovers adore.
- Buttery Shortbread Cookies: Their crumbly texture serves as a delightful contrast to the smooth layers of the creamy brownie cake, offering a delightful nibble.
- Sparkling Lemonade: A chilled glass of sparkling lemonade serves as a refreshing palate cleanser between bites, making it a perfect drink pairing for the cake.
Make Ahead Options
These Creamy Brownie Cakes are ideal for meal prep, saving you precious time on busy days! You can prepare the brownie base and the cream cheese layer up to 24 hours in advance and store them covered in the refrigerator to maintain their flavor and texture. While the brownies cool, simply make the cream cheese layer and store it separately. When you’re ready to assemble, spread the cream cheese layer over the cooled brownies, prepare the pudding layer as directed, and top with whipped cream. Just remember to chill for at least 4 hours or overnight before serving to ensure all layers set beautifully, guaranteeing a delicious dessert that impresses your family and friends!
Creamy Brownie Cake Variations
Feel free to get creative with these delightful twists that enhance your dessert experience!
- Cookies & Cream: Incorporate crushed Oreos into the cream cheese layer for a nostalgic cookies-and-cream flavor.
- Peanut Butter Swirl: Add a delicious swirl of peanut butter to the pudding mix for a creamy, peanut butter-chocolate fusion.
- Nutty Crunch: Fold in chopped walnuts or pecans into the brownie base for an added texture that pairs beautifully with the creamy layers.
- Minty Fresh: Infuse the pudding layer with a few drops of peppermint extract for a refreshing coolness that makes each bite delightful.
- Fruit Delight: Add a layer of fresh raspberries or sliced strawberries between the cream cheese and pudding layers for a fruity twist that brightens up the flavor.
- Caramel Drizzle: Drizzle caramel sauce over the top of the whipped cream for an indulgent touch that complements the chocolate wonderfully.
- Spicy Kick: Sprinkle a pinch of cayenne pepper into the brownie mix for a surprising heat that’s both bold and delicious.
- Vegan Alternative: Use plant-based cream cheese and whipped topping, along with a vegan brownie mix or homemade recipe, to create a creamy brownie cake that everyone can enjoy!
With so many options, your creamy brownie cake can be uniquely yours! If you’re looking for more inspiration, don’t hesitate to explore variations like adding crushed nuts or trying out different whipped toppings. Every bite will be a joyful surprise!
Expert Tips for Creamy Brownie Cake
- Chill Time Matters: Refrigerate the cake overnight to allow the layers to set properly, ensuring a solid structure for perfect slicing.
- Cutting Technique: Use a sharp, hot knife to slice the cake for clean, bakery-style squares—dip it in hot water for best results!
- Layer Interaction: Make sure the brownie base is completely cool before layering to avoid any runny cream cheese or pudding layers.
- Flavor Boost: For richer chocolate flavor, add 1 teaspoon of instant espresso powder to the brownie mix and ½ teaspoon to the pudding.
- Whipped Topping Swap: For homemade flair, replace Cool Whip with stabilized whipped cream for a taste that rivals bakery desserts.
Creamy Brownie Cake Recipe FAQs
What type of brownie mix is best for this recipe?
Absolutely! You can use any brand of brownie mix that you love. If you prefer a homemade touch, a scratch brownie recipe works wonderfully too. Just make sure to let the brownies cool completely before adding the layers to avoid a melty mess!
How long can I store the Creamy Brownie Cake in the fridge?
You can store your Creamy Brownie Cake in the refrigerator for up to 4-5 days. Just cover it tightly with plastic wrap or foil to keep it fresh. The flavors actually meld beautifully as it sits!
Can I freeze the Creamy Brownie Cake?
Very! You can freeze the entire cake or individual slices. Wrap it securely in plastic wrap and then aluminum foil to prevent freezer burn. It can last up to 3 months. When you’re ready to indulge, just thaw it in the refrigerator overnight for the best results.
What should I do if the brownie base is too warm when adding layers?
To avoid any runny layers, ensure that the brownie base is completely cooled before layering. If you find it’s still warm, let it cool in the pan on a wire rack for about 20-30 minutes; this helps create distinct layers and prevents the cream cheese from melting.
Is this recipe suitable for those with gluten allergies?
If you or your guests have gluten sensitivities, you can definitely substitute a gluten-free brownie mix for the base! Just check the labels to ensure all other ingredients, like the pudding mix and Cool Whip, are also gluten-free to avoid any issues.
Indulge in This Creamy Brownie Cake for Sweet Memories
Ingredients
Equipment
Method
- Preheat your oven to 350°F (175°C) and grease a 9x13-inch baking pan. Prepare the brownie mix according to the package instructions, incorporating the extra-large egg. Pour the batter into the prepared pan and bake for 25–30 minutes or until a toothpick inserted comes out clean. Allow to cool completely.
- While the brownies cool, beat the softened cream cheese and powdered sugar together until smooth. Fold in one container of thawed Cool Whip and spread evenly over the cooled brownie.
- In another bowl, whisk together the instant chocolate pudding mix and instant vanilla pudding mix with 3.5 cups of cold milk for about 2 minutes until thickened. Pour this mixture over the cream cheese layer, spreading evenly.
- Spread the second container of thawed Cool Whip over the pudding layer to create a smooth, even layer.
- Garnish with chocolate shavings or a drizzle of chocolate syrup. Cover with plastic wrap and refrigerate for at least 4 hours or overnight.
Leave a Reply