
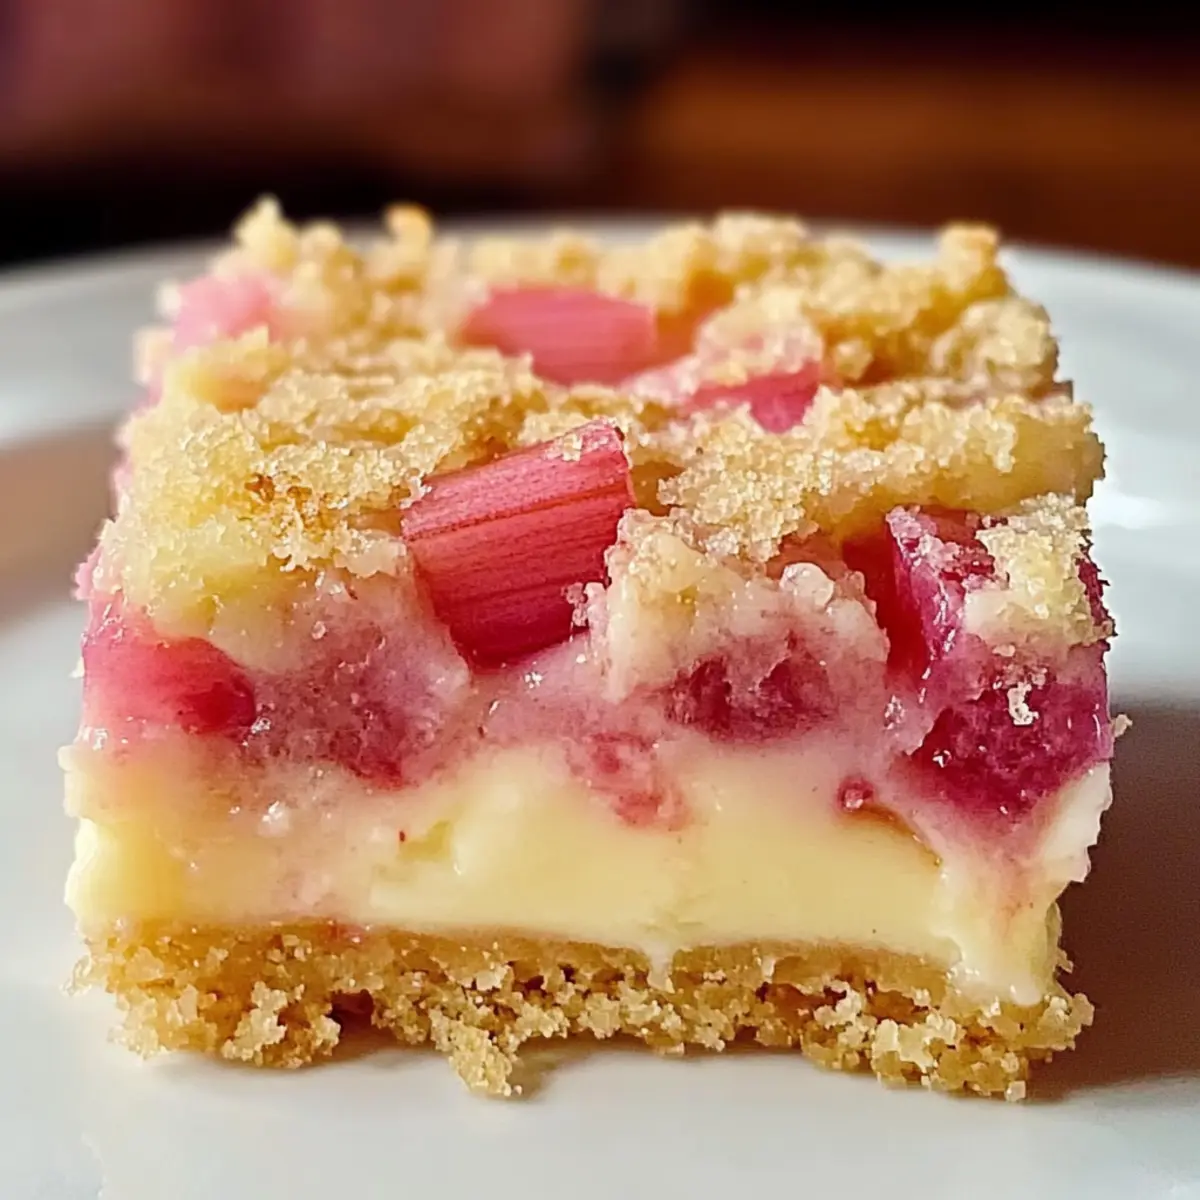
As the first hints of spring emerge, I find myself reflecting on the vibrant memories intertwined with the season’s flavors. These Rhubarb Dream Bars are a delightful nod to those cherished moments, offering a perfect balance of tangy and sweet that dances on the palate. With a buttery shortbread crust and a creamy, custard-like filling, this recipe boasts simplicity at its best, made with just six straightforward ingredients. They’re not only a breeze to whip up but also a guaranteed crowd-pleaser, whether you’re enjoying a quiet afternoon or hosting friends. Why not bring a little slice of nostalgia to your kitchen? Let’s dive in and create something magical together!

Why are Rhubarb Dream Bars a must-try?
Breathtaking Flavor: The tartness of rhubarb perfectly complements the sweetness of the creamy filling, creating a symphony of flavors that will leave your taste buds singing.
Effortless Preparation: With only six simple ingredients, you can whip these up in no time, making them an excellent choice for both novice and seasoned bakers alike.
Crowd-Pleasing Treat: Whether it’s a family gathering or a friendly get-together, these Rhubarb Dream Bars are sure to charm everyone at the table, leaving them asking for seconds!
Versatile Options: Feel free to swap out rhubarb for fruits like strawberries or raspberries to cater to different tastes or seasonal availability.
Ideal for Spring: As a lovely way to celebrate spring flavors, these bars will evoke warm memories of sunny days and fresh produce.
Don’t forget to check out our optional gluten-free substitutions to ensure everyone can enjoy these delightful treats!
Rhubarb Dream Bars Ingredients
• Here’s everything you need for making these delightful bars!
For the Crust
- All-Purpose Flour – Provides structure for the crust and filling; for a gluten-free version, use a 1:1 gluten-free flour blend.
- Powdered Sugar – Adds sweetness and a delicate texture to the buttery crust.
- Butter (cold and cubed) – Infuses richness and ensures a flaky, tender crust.
For the Filling
- Large Eggs – Acts as a binding agent, essential for the creamy, custard-like texture. Note: Room temperature eggs mix better for an even consistency.
- Granulated Sugar – Sweetens the filling and balances the tartness of the rhubarb.
- Salt – Enhances the overall flavor of the Rhubarb Dream Bars.
- Diced Rhubarb – The star ingredient providing tangy flavor; fresh or thawed frozen rhubarb is perfect!
- Ground Cinnamon (optional) – Adds warmth and depth to the flavor; a cozy twist that pairs beautifully with the rhubarb.
Step‑by‑Step Instructions for Rhubarb Dream Bars
Step 1: Preheat and Prepare
Begin by preheating your oven to 325°F (163°C). While the oven warms up, grease a 9×13 inch baking pan to ensure your Rhubarb Dream Bars release easily after baking. This preparation is crucial, so don’t skip this step, as it creates a lovely foundation for your dessert!
Step 2: Make the Crust
In a large mixing bowl, combine 2 cups of all-purpose flour with ½ cup of powdered sugar. Next, cut in 1 cup of cold, cubed butter using a pastry cutter or your fingers until the mixture resembles coarse crumbs. This buttery crumb mixture will form the base of your Rhubarb Dream Bars, giving it a light, flaky crust.
Step 3: Bake the Crust
Evenly press the crumb mixture into the bottom of your prepared baking pan, creating a solid layer. Place the pan in the preheated oven and bake for 15 minutes, or until just set but not browned. This step creates a lovely foundation to support the tangy filling that follows.
Step 4: Prepare the Filling
While the crust is baking, whisk 4 large eggs in the same mixing bowl until lightly beaten. Stir in 2 cups of granulated sugar, followed by ½ cup of all-purpose flour, 1 teaspoon of salt, and cinnamon (if desired). This mixture will develop the custard-like filling of your Rhubarb Dream Bars, ensuring a delightful flavor balance.
Step 5: Add the Rhubarb
Carefully fold in 4 cups of diced rhubarb, making sure it’s evenly distributed throughout the mixture. The vibrant chunks of rhubarb will provide that signature tangy flavor that defines your Rhubarb Dream Bars. Once evenly mixed, it’s time to pour the filling over the pre-baked crust.
Step 6: Bake the Bars
Return the pan to the oven and bake for an additional 60 minutes, until the center is set and no longer jiggly. You’ll know they’re ready when the top is lightly golden and firm to the touch. This final bake transforms the filling into a creamy, custard-like texture that perfectly complements the crust.
Step 7: Cool and Slice
Once done, remove the Rhubarb Dream Bars from the oven and allow them to cool completely in the pan. Cooling is essential—this helps achieve the perfect texture for slicing. Once cooled, cut into squares and serve to enjoy the delicious combination of flavors and textures!
Rhubarb Dream Bars Variations & Substitutions
Feel free to play around with these Rhubarb Dream Bars to suit your taste buds and dietary preferences!
-
Gluten-Free: Swap all-purpose flour for a 1:1 gluten-free flour blend to enjoy these bars without gluten.
-
Sweet Fruit Twist: Substitute rhubarb with chopped strawberries, peaches, or blueberries for a sweeter, fruity variation that’s equally delightful.
-
Nutty Crunch: Add a ½ cup of chopped pecans or almonds into the filling for a satisfying crunch that contrasts beautifully with the creamy texture.
-
Zesty Lemon: Incorporate a teaspoon of lemon zest into the filling to add a refreshing brightness that elevates the flavors of the dessert.
-
Cinnamon Spice: Boost the flavor by adding ½ teaspoon of nutmeg along with the ground cinnamon to give the bars a cozy, spiced warmth.
-
Dairy-Free: Use vegan butter and egg replacer to make these bars dairy-free while maintaining their impressive texture and flavor.
-
Lower Sugar: Try reducing the granulated sugar by ¼ cup or substituting it with coconut sugar for a slightly healthier version without sacrificing taste.
-
Berry Rhubarb Duo: Mix in 1 cup of frozen mixed berries along with rhubarb to create an inviting contrast of flavors and vibrant colors.
These variations allow you to explore and enjoy the essence of rhubarb beyond the ordinary, making every occasion special! For some delicious ways to use seasonal produce, check out our spring flavors suggestions to enhance your culinary adventures.
What to Serve with Rhubarb Dream Bars?
Pair your delightful creation with the perfect accompaniments that elevate the experience to new heights!
-
Fresh Berry Salad: Bright, juicy berries add a refreshing contrast, balancing out the tangy richness of the bars while bringing a burst of color to the plate.
-
Whipped Cream: Light and fluffy, a dollop of sweetened whipped cream enhances the creamy filling and adds a luxurious texture that feels indulgent.
-
Iced Tea: A tall glass of homemade iced tea, whether sweetened or unsweetened, offers a refreshing sip that complements the dessert’s tangy notes beautifully.
-
Vanilla Ice Cream: The cool, creamy goodness of vanilla ice cream offers a wonderful contrast to the warm bars, while its sweetness balances the rhubarb’s tartness perfectly.
-
Lemonade: A tangy, homemade lemonade’s brightness enhances the flavors of the rhubarb, making it feel like a true summertime treat.
-
Cheese Platter: Pairing these bars with a selection of tangy goat cheese or creamy Brie adds depth to your meal, creating a delightful contrast in flavors.
-
Pecan Pie Bars: If you’re feeling adventurous, serve alongside pecan pie bars for a flavor explosion that will delight your guests with rich and nutty tastes.
These pairings will not only enhance your Rhubarb Dream Bars but also create a delightful and enjoyable experience for everyone at the table!
How to Store and Freeze Rhubarb Dream Bars
Room Temperature: Keep the bars at room temperature for up to 2 hours when serving. After that, store them in the fridge for the best flavor and texture.
Fridge: Store leftover Rhubarb Dream Bars in an airtight container in the refrigerator for up to 4-5 days. This helps maintain their creamy filling and keeps them fresh.
Freezer: If you want to enjoy Rhubarb Dream Bars later, freeze them for up to 2 months. Wrap each bar in plastic wrap, then place them in a freezer bag to prevent freezer burn.
Reheating: For a delightful treat, thaw the bars in the fridge overnight before serving. You can enjoy them chilled or let them come to room temperature for that perfect custard-like texture!
Make Ahead Options
These Rhubarb Dream Bars are perfect for meal prep! You can prepare the crust and filling up to 24 hours in advance. Make the crust and press it into the pan as instructed, then cover it tightly with plastic wrap and refrigerate. For the filling, mix the ingredients and store it in an airtight container in the refrigerator; this will keep the rhubarb fresh and prevent it from becoming soggy. When you’re ready to bake, simply pour the prepared filling over the chilled crust and bake as directed. This way, you can enjoy delicious, homemade Rhubarb Dream Bars with minimal effort on busy weeknights!
Expert Tips for Rhubarb Dream Bars
-
Cool Completely: Allow the bars to cool thoroughly before slicing. This step is essential for achieving firm, clean edges when you cut into your Rhubarb Dream Bars.
-
Use Fresh Rhubarb: If possible, opt for fresh rhubarb as it provides the best tart flavor and texture. Thaw frozen rhubarb and drain excess moisture to avoid a soggy filling.
-
Check Oven Temperature: Keep an eye on your oven’s temperature; uneven baking can lead to a custard filling that won’t set properly. A well-calibrated oven ensures perfect Rhubarb Dream Bars every time.
-
Mix Room Temperature Eggs: Ensure your eggs are at room temperature for optimal mixing and even texture in your filling. This little trick makes a big difference in creating that lush custard layer.
-
Add Texture: For a delightful crunch, sprinkle some chopped nuts—like pecans or almonds—over the filling before baking, enhancing both flavor and texture of your Rhubarb Dream Bars.

Rhubarb Dream Bars Recipe FAQs
What kind of rhubarb should I use?
Absolutely! Fresh rhubarb is your best bet for that vibrant tang and optimal texture. If you choose to use frozen rhubarb, make sure to thaw it first and drain any excess moisture, as sogginess can affect the filling’s consistency.
How should I store leftover Rhubarb Dream Bars?
Very well! Store any leftover bars in an airtight container in the refrigerator for up to 4-5 days. This keeps them fresh and preserves their creamy filling. Just remember, they are best served chilled or at room temperature, so feel free to take them out a bit before enjoying.
Can I freeze the Rhubarb Dream Bars?
Absolutely! These bars can be frozen for up to 2 months. To freeze, wrap each individual bar in plastic wrap, then place them in a freezer bag to prevent freezer burn. When you’re ready to enjoy, simply thaw them overnight in the refrigerator.
Why is my filling not setting properly during baking?
Don’t worry, it’s a common hiccup! Ensure that you bake your Rhubarb Dream Bars long enough—about 60 minutes—until the center is set and firm. If your oven runs cool or unevenly, the filling may need a few extra minutes. Keeping an eye on your oven’s temperature is vital for that perfect custard-like consistency!
Can I make these bars gluten-free?
Absolutely! Creating a gluten-free version is simple. Just substitute all-purpose flour with a 1:1 gluten-free flour blend. This way, everyone can enjoy the delightful tangy goodness of Rhubarb Dream Bars without missing out!

Rhubarb Dream Bars: A Tangy Slice of Spring Delight
Ingredients
Equipment
Method
- Preheat your oven to 325°F (163°C) and grease a 9x13 inch baking pan.
- Combine 2 cups of all-purpose flour with 0.5 cups of powdered sugar in a large mixing bowl.
- Cut in 1 cup of cold, cubed butter until the mixture resembles coarse crumbs.
- Press the crumb mixture into the baking pan and bake for 15 minutes until just set.
- In the same bowl, whisk 4 large eggs until lightly beaten. Stir in 2 cups of granulated sugar, 0.5 cups of all-purpose flour, 1 teaspoon of salt, and ground cinnamon if desired.
- Fold in 4 cups of diced rhubarb and pour this mixture over the pre-baked crust.
- Bake for an additional 60 minutes until set and lightly golden on top.
- Cool completely in the pan before slicing into squares.
Leave a Reply