
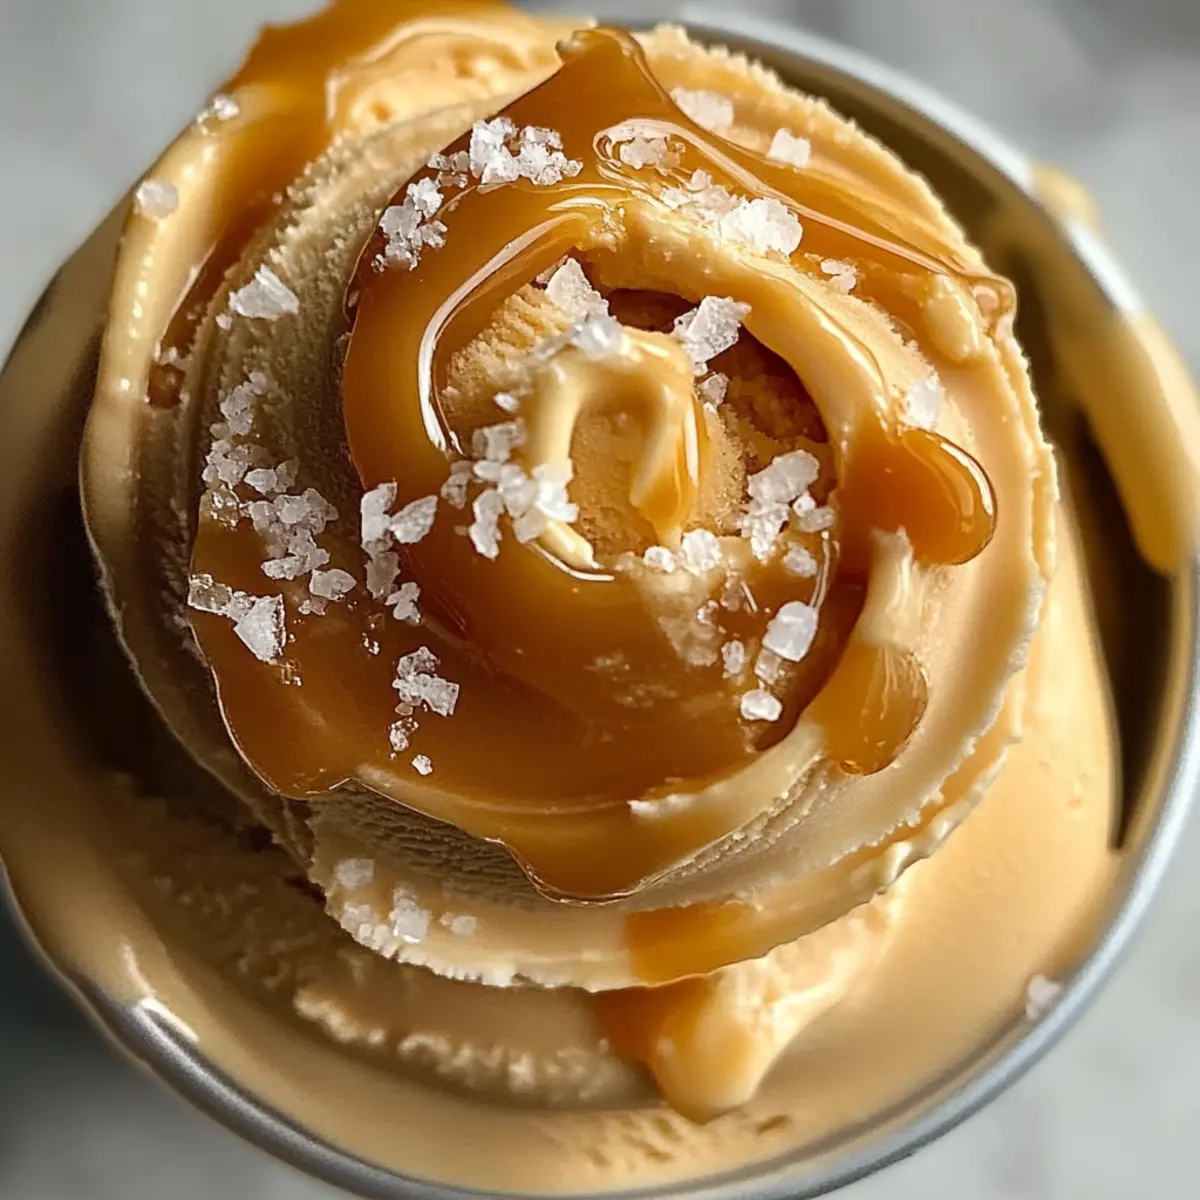
As I stood in my kitchen, the sweet aroma of caramel began to fill the air, sparking a sense of nostalgia that whisked me back to childhood ice cream parlors. There’s something magical about making homemade salted caramel ice cream that not only tantalizes the taste buds but also sparks joy in the heart. This creamy delight is incredibly simple to whip up, especially with the Ninja Creami, turning ordinary ingredients into a gourmet experience right at home. Not only is this salted caramel ice cream gluten-free, but it’s also made with real ingredients, allowing you to savor the rich, buttery flavor without any guilt. Ready to take a scoop of this blissful creation? Let’s dive into the world of homemade indulgence together—one delicious bowl at a time!
Why is Homemade Ice Cream a Game Changer?
Unforgettable Taste: There’s nothing quite like the rich, buttery flavor of homemade salted caramel ice cream; it’s a delightful treat that’s hard to resist.
Effortless Preparation: Using the Ninja Creami, you can create this gourmet indulgence with minimal hassle!
Real Ingredients: Made with simple, wholesome ingredients, this ice cream is gluten-free and perfect for anyone wanting an artisanal touch at home.
Customizable Delights: Feeling adventurous? Experiment with different flavors and mix-ins for a personalized twist!
Perfect for Sharing: This ice cream is sure to impress family and friends, making it an ideal dessert for gatherings or cozy nights in.
Salted Caramel Ice Cream Ingredients
For the Ice Cream Base
• Heavy Cream – Provides a rich, creamy texture; can use half-and-half for a lighter variation.
• Whole Milk – Adds creaminess while balancing the richness; substitute with low-fat milk, though texture will change.
• Granulated Sugar – Sweetens both the ice cream and caramel; avoid brown sugar as it alters the flavor profile.
• Egg Yolks – Create a luxurious custard base; do not skip as substitutes may yield a different texture.
• Unsalted Butter – Adds smoothness and richness to caramel; can omit for a dairy-free version, but flavor will differ.
• Vanilla Extract – Enhances the flavor; use pure vanilla for the best results.
For the Caramel
• Light Corn Syrup – Helps prevent crystallization in caramel; glucose syrup can be a substitute but may affect flavor.
• Sea Salt Flakes – Provides a beautiful contrast to sweetness; use flaky sea salt for best texture; avoid table salt.
This recipe for salted caramel ice cream is sure to elevate your dessert experience with its luscious, creamy texture and delightful flavors!
Step‑by‑Step Instructions for Salted Caramel Ice Cream
Step 1: Make Caramel
In a heavy-bottomed saucepan, combine granulated sugar and light corn syrup over medium heat. Cook undisturbed for about 8-10 minutes until the mixture reaches a deep amber color. Remove it from the heat and, while whisking, gradually add the unsalted butter until the caramel is smooth and glossy. Set aside to cool slightly, allowing the rich flavors of your salted caramel to develop.
Step 2: Prepare Custard Base
In a separate saucepan, heat the heavy cream and whole milk over medium heat until it just begins to simmer. While the cream mixture warms, whisk together egg yolks and remaining granulated sugar in a bowl until the mixture is pale and slightly thickened. Once the cream is hot, slowly pour it into the egg mixture while whisking continuously to temper the yolks and prevent scrambling.
Step 3: Cook Custard
Return the tempered mixture to the saucepan over low heat, stirring constantly with a spatula until the custard thickens and coats the back of a spoon—this should take about 5-7 minutes and the temperature should reach around 170°F. Once thickened, strain the custard through a fine-mesh sieve to remove any coagulated bits and stir in pure vanilla extract. Let it cool completely for the best results in your salted caramel ice cream.
Step 4: Combine & Freeze
Swirl the cooled caramel into the custard mixture, ensuring you have delightful ribbons of that sweet-filled goodness. Pour the combined mixture into the Ninja Creami pint container, cover it tightly, and freeze in the freezer for at least 24 hours. This step is crucial, allowing the flavors to meld beautifully while achieving the perfect ice cream consistency.
Step 5: Process Ice Cream
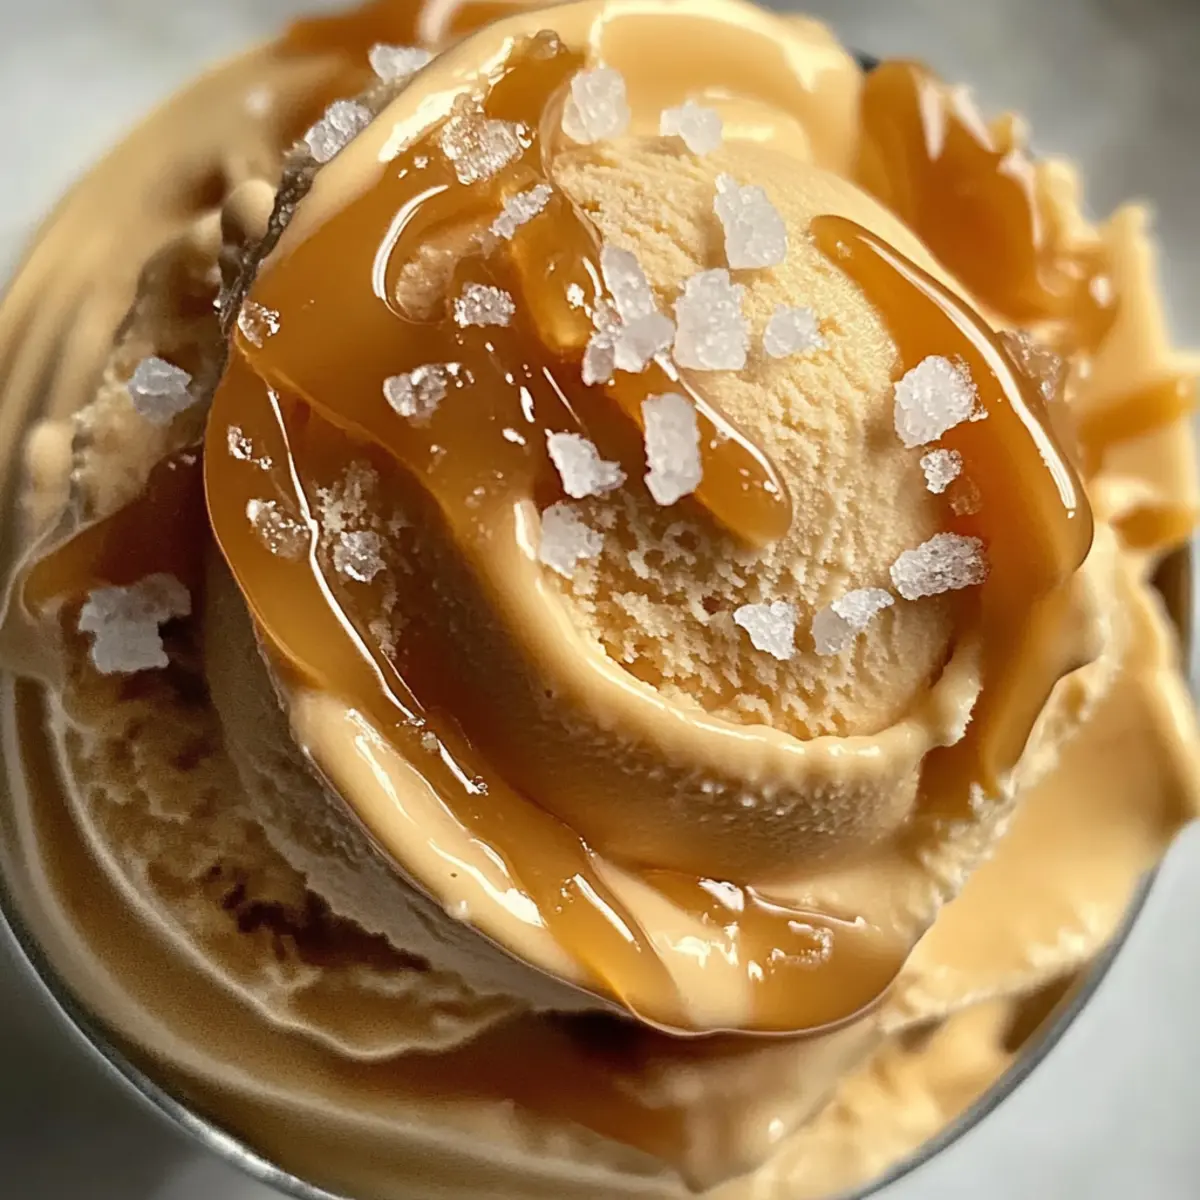
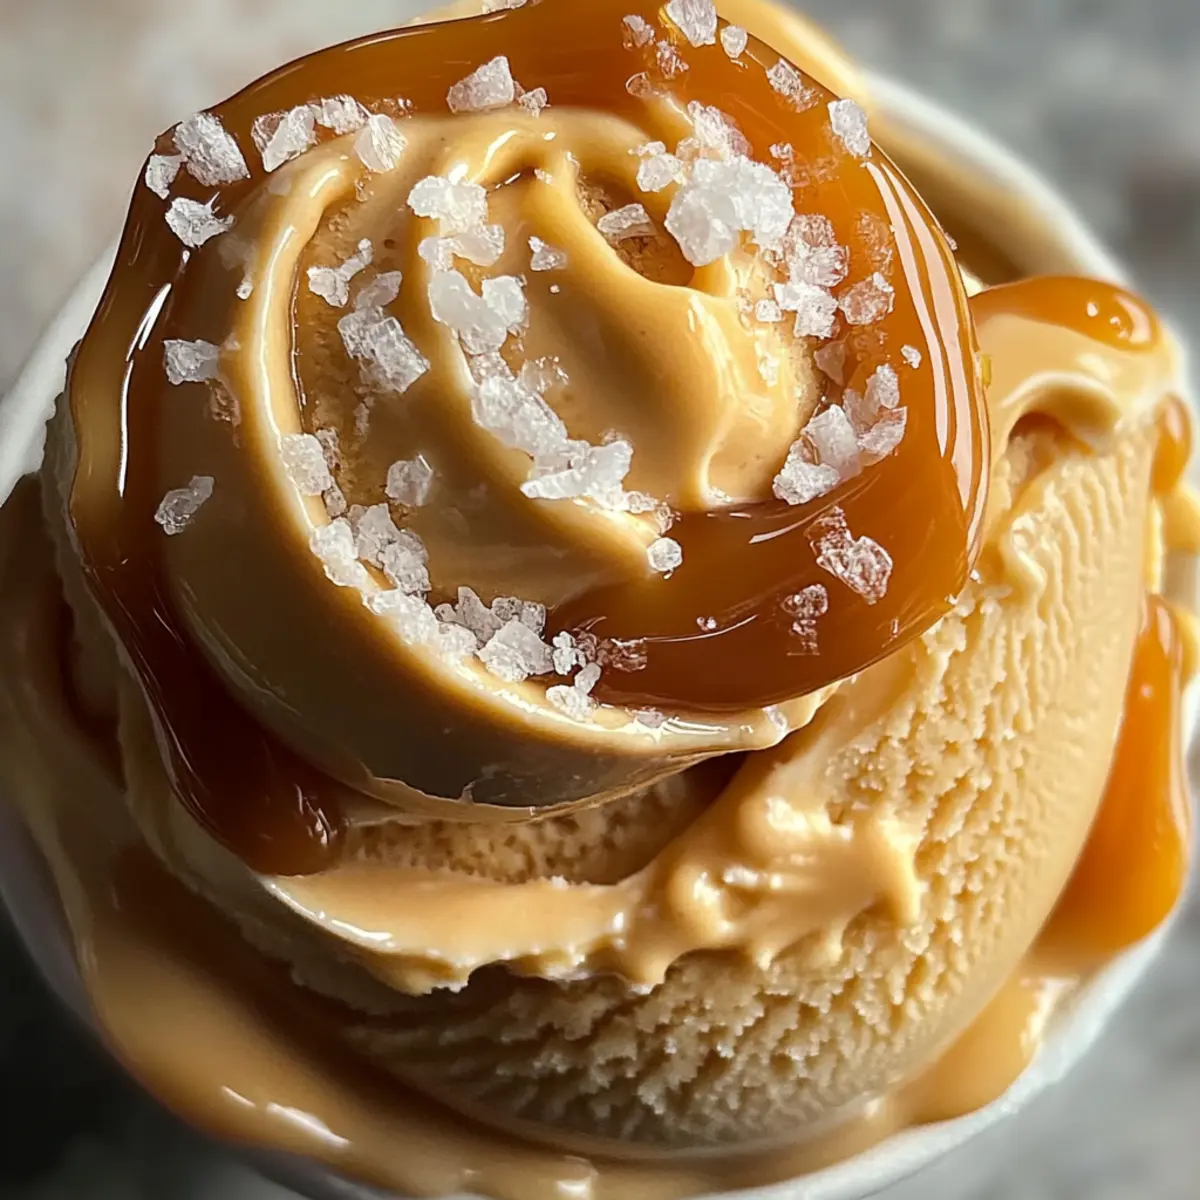
After the freezing period, place the pint container into the Ninja Creami and select the “Ice Cream” setting to process your salted caramel ice cream. If you prefer an even creamier texture, feel free to use the “Re-spin” function. Once processed, you’ll have a luscious ice cream swirled with handcrafted caramel, ready to be served!
Step 6: Serve & Enjoy
Scoop the freshly made salted caramel ice cream into bowls and be generous with those beautiful sea salt flakes—this finishing touch enhances the flavors. Serve immediately and indulge in this decadent treat, perfect for any occasion or simply to satisfy your dessert cravings.

Expert Tips for the Best Salted Caramel Ice Cream
-
Perfect Custard: Ensure the custard thickens enough to coat the back of a spoon; this is vital for a luxurious texture in your salted caramel ice cream.
-
Caramel Caution: Avoid stirring the caramel while it cooks to prevent crystallization, which could ruin the smoothness of your finished product.
-
Clean Cookware: Use a clean saucepan for making caramel to guard against graininess; if your caramel does become grainy, reheat with a bit of water and whisk until smooth.
-
Salt Selection: Opt for flaky sea salt, which provides the best texture and taste contrast; table salt can overly dissolve and diminish that delightful crunch!
-
Chill Before Processing: Make sure the mixture is completely cooled before freezing it in the Ninja Creami to ensure an incredibly creamy salted caramel ice cream.
Make Ahead Options
These delightful Salted Caramel Ice Cream treats are perfect for meal prep enthusiasts! You can make the caramel and custard base up to 3 days in advance, allowing the rich flavors to develop beautifully. Prepare the caramel, cool it, and then combine it with the custard base. Once fully mixed, pour the ice cream mixture into your Ninja Creami pint container and freeze it for at least 24 hours. To ensure that your salted caramel ice cream retains its luscious texture, be sure to cover it tightly to prevent ice crystals. When you’re ready to enjoy, simply process the mixture in your Ninja Creami, and you’ll have a gourmet dessert that is just as delicious as it would be on the day of preparation!
Salted Caramel Ice Cream Variations
Feel inspired to give your homemade salted caramel ice cream a twist that showcases your culinary creativity!
- Dairy-Free: Substitute heavy cream and whole milk with full-fat coconut cream for a rich, dairy-free version that’s equally luscious.
- Nutty Crunch: Add in a handful of toasted pecans or walnuts before freezing to infuse delightful texture and flavor in each scoop.
- Chocolate Lovers: Incorporate chocolate chips or a swirl of fudge to enhance richness, turning your salted caramel ice cream into a chocolatey delight.
- Spiced Delight: Sprinkle a pinch of cinnamon or ginger into the custard base for a warm spice that elevates the caramel flavor beautifully.
- Fruit Fusion: Mix in some crushed fresh raspberries or strawberries for a refreshing fruity contrast to the rich, creamy caramel.
- Caramel Swirl: Drizzle extra caramel sauce throughout the mixture before freezing, allowing for layers of added sweetness in every bite.
- Espresso Infusion: Stir in a tablespoon of espresso powder into the custard base for a delightful coffee flavor that plays well with caramel.
- Savory Twist: Add a touch of smoked sea salt instead of regular sea salt for a unique, savory finish that contrasts beautifully with the sweetness.
By making these small adjustments, you can create customize your ice cream, making it feel like a brand-new indulgence each time you make it! If you love flavor variations, experiment with our other delicious homemade ice creams too, like vanilla bean or mint chocolate chip!
What to Serve with Salted Caramel Ice Cream
Set the mood for a delightful dessert experience with these complementary flavors and indulgences that enhance your homemade treat.
-
Warm Apple Crisp: The fluffy, tender apples and crunchy topping pair beautifully with the creaminess of the ice cream, creating a cozy warmth in every bite.
-
Fudgy Chocolate Brownies: Rich chocolate complements the sweet and salty notes in the ice cream, delivering an indulgent dessert duo that’s utterly irresistible.
-
Toasted Nuts: Adding toasted pecans or almonds brings a delightful crunch and nutty flavor that contrasts wonderfully with the creamy texture of the ice cream.
-
Caramel Sauce: Drizzling a bit of extra caramel sauce over the ice cream intensifies the flavor, creating a true gourmet dessert that’s hard to resist.
-
Fresh Berries: The tartness of strawberries or raspberries cuts through the sweetness of the ice cream, adding a fresh and fruity element to your dessert spread.
-
Espresso or Coffee: A bold cup of coffee enhances the ice cream’s flavors while providing a nice pick-me-up after a decadent meal, rounding out your experience beautifully.
How to Store and Freeze Salted Caramel Ice Cream
Fridge: Store in an airtight container and consume within 3-5 days for optimal taste and texture. After this, the flavor may diminish.
Freezer: Place your salted caramel ice cream in an airtight container for up to 2 weeks. Beyond that, ice crystals may form, affecting quality and flavor.
Reheating: If ice cream becomes too hard, let it sit at room temperature for about 10-15 minutes before scooping for easier serving.
Serving: When ready to enjoy, scoop and top with additional sea salt or caramel for a gourmet touch right at home!
Salted Caramel Ice Cream Recipe FAQs
What is the best way to select ripe ingredients for salted caramel ice cream?
Absolutely! While this recipe primarily involves pantry staples, fresh ingredients are key. For heavy cream and milk, choose those with the latest expiration dates for optimal freshness. If you’re using eggs, select large, organic eggs if possible for richer flavor.
How long can I store leftover salted caramel ice cream?
You can store your salted caramel ice cream in an airtight container in the freezer for up to 2 weeks. Beyond that, ice crystals may form, negatively affecting the texture and taste. For the best experience, try to enjoy it within that timeframe!
Can I freeze salted caramel ice cream for longer?
Yes, you can freeze it for up to 3 months! Just be sure to store it in an airtight container. To preserve its creamy texture, press a piece of parchment paper against the surface of the ice cream before sealing it with a lid. This prevents ice crystals from forming.
What should I do if my caramel is grainy?
If your caramel turns out grainy, don’t worry—it happens to the best of us! Simply add a tablespoon of hot water to the pan with the grainy caramel and gently whisk over low heat until it becomes smooth again. Enjoy that silky texture in your salted caramel ice cream!
Are there any dietary considerations for this recipe?
Yes, this salted caramel ice cream is made with real ingredients and is gluten-free, making it a delightful treat for those with gluten sensitivity. However, keep in mind that it contains dairy, so if you have lactose intolerance or dairy allergies, consider substituting with coconut cream in place of heavy cream and milk for a delicious dairy-free option.
Irresistible Salted Caramel Ice Cream You Can Make at Home
Ingredients
Equipment
Method
- In a heavy-bottomed saucepan, combine granulated sugar and light corn syrup over medium heat. Cook undisturbed for about 8-10 minutes until the mixture reaches a deep amber color. Remove it from the heat and, while whisking, gradually add the unsalted butter until the caramel is smooth and glossy. Set aside to cool slightly.
- In a separate saucepan, heat the heavy cream and whole milk over medium heat until it just begins to simmer. While the cream mixture warms, whisk together egg yolks and remaining granulated sugar in a bowl until the mixture is pale and slightly thickened. Slowly pour the hot cream into the egg mixture while whisking continuously.
- Return the tempered mixture to the saucepan over low heat, stirring constantly until the custard thickens and coats the back of a spoon, about 5-7 minutes, reaching around 170°F. Strain through a fine-mesh sieve and stir in vanilla extract. Let it cool completely.
- Swirl the cooled caramel into the custard mixture, then pour it into the Ninja Creami pint container, cover tightly, and freeze for at least 24 hours.
- After the freezing period, process the pint container in the Ninja Creami using the 'Ice Cream' setting. Optionally use the 'Re-spin' function for creamier texture.
- Scoop the ice cream into bowls, topping generously with sea salt flakes. Serve immediately and indulge!
Leave a Reply